


【PowerShell、HTML】画像の不要な部分を数値化して、その座標でトリミングする

はじまり

HTMLとJavaScriptとPowerShellで一気にトリミング。
色々と記事を書いていて、そのための画像を作っていると必要になってくるんですよね。画像のトリミングツール。
以前に作ったものもあるんですけど、もうちょい楽に動かせないのかと思って、この際新しく作り直しました。
ツール全体の処理の流れとしては、ブラウザ上で画像を表示してその上でバーを動かしてトリミングする座標を特定して、その座標をPowerShellの関数に渡してその画像があるフォルダ内の画像を一気にトリミングする。といった感じのものです。
トリミングする様子はこんな感じです。それでは行ってみましょう。
HTML、JavaScriptによる座標の可視化
それではまずは、画像のどの部分が不要なのかを可視化出来るツールを作っていきます。
以前に、Pythonでmatplotlibとtkinterのライブラリを使った大所帯でトリミングツールを作りました。今回作ろうと思っているツールも殆ど同じ機能のものです。
しかし、この程度のトリミングツールにそんなに大層なライブラリを使う必要はなく、Pythonをインストールする必要もありません。
今回は、HTMLで作っていきたいと思います。HTMLで作れそうなことは勘付いていましたが、フロントエンド開発の経験が殆どない僕は実際にどういうものを使えば作れるのかは分かっていませんでした。
ですがしかし、生成AI、今回はNVIDIA様のNemotron 70B-Instruct君に聞いたら、使えそうなコードを作ってくれましたので、それを元に作りました。(本当に生成AIって凄いですね・・・。)
HTMLとJavaScriptのコードの概観
というわけで、実際にトリミング座標描画ツールを実装したHTMLおよびJavaScriptコードは以下になります。HTMLに設置したdivタグに画像を表示して、その上にバーも表示してさらに移動させることが出来るみたいです。
index.html:
<!DOCTYPE html><html lang="ja">
<head> <meta charset="UTF-8"> <meta name="viewport" content="width=device-width, initial-scale=1.0"> <title>image_trimmer</title> <link rel="stylesheet" href="style.css"></head>
<body> <input type="file" id="imageLoader" accept="image/*"> <div id="imageView" style="position: relative; width: fit-content;"> <img id="imageElement" src="" alt="Choose an image."> <!-- Vertical Bar(X-axis_upper) --> <div id="draggableBarXUpper" style="position: absolute; width: 5px; height: 100%; background-color: red; cursor: grab; left: 0;"></div> <!-- Horizontal Bar(Y-axis_upper) --> <div id="draggableBarYUpper" style="position: absolute; width: 100%; height: 5px; background-color: blue; cursor: grab; top: 0;"></div> <!-- Vertical Bar(X-axis_lower) --> <div id="draggableBarXLower" style="position: absolute; width: 5px; height: 100%; background-color: yellow; cursor: grab; left: 0;"></div> <!-- Horizontal Bar(Y-axis_lower) --> <div id="draggableBarYLower" style="position: absolute; width: 100%; height: 5px; background-color: green; cursor: grab; top: 0;"></div> </div> <div style="display: flex; gap: 10px;"> <span>X: </span> <input type="text" id="coordinateXUpperDisplay" readonly style="width: 100px;"> <span id="coordinateXUpperUnit">px</span> <span>Y: </span> <input type="text" id="coordinateYUpperDisplay" readonly style="width: 100px;"> <span id="coordinateYUpperUnit">px</span> </div> <div style="display: flex; gap: 10px;"> <span>X: </span> <input type="text" id="coordinateXLowerDisplay" readonly style="width: 100px;"> <span id="coordinateXLowerUnit">px</span> <span>Y: </span> <input type="text" id="coordinateYLowerDisplay" readonly style="width: 100px;"> <span id="coordinateYLowerUnit">px</span> </div> <p id="lockStatus"></p><!-- Paragraph to show the status of lock --> <div style="display: flex; gap: 10px;"> <span>X: </span> <input type="text" id="coordinateXUpperDisplayToRecord" style="width: 100px;"> <span id="coordinateXUnit">px</span> <span>Y: </span> <input type="text" id="coordinateYUpperDisplayToRecord" style="width: 100px;"> <span id="coordinateYUnit">px</span> </div> <div style="display: flex; gap: 10px;"> <span>X: </span> <input type="text" id="coordinateXLowerDisplayToRecord" style="width: 100px;"> <span id="coordinateXUnit">px</span> <span>Y: </span> <input type="text" id="coordinateYLowerDisplayToRecord" style="width: 100px;"> <span id="coordinateYUnit">px</span> </div> <p id="copyToCb"></p><!-- Paragraph to show the status whether coordinates are copied into clipboard or not. -->
<script src="script.js"></script></body>
</html>style.css(要るのか?):
/* style.css - Image and Bar Basic Styles */#draggableBarYUpper { left: 0; /* Initialize position to the left edge of the image */ top: 0; /* Align vertically to the center of the image */ transform: translateY(-50%);}
#draggableBarXUpper { top: 0; /* Initialize position to the top of the image */ left: 0; /* Align horizontally to the center of the image */ /* No need for 'left: 50%' and 'transform' to match the image width */}
#draggableBarYLower { left: 0; /* Initialize position to the left edge of the image */ top: 100; /* Note: This seems to be a specific offset rather than centering */ transform: translateY(-50%);}
#draggableBarXLower { top: 0; /* Initialize position to the top of the image */ left: 0; /* Align horizontally to the center of the image */ /* No need for 'left: 50%' and 'transform' to match the image width */}script.js:
// script.js - Image Loading and Mouse Tracking Bar Functionality
const handleImageChange = (e) => { update(false, { isInputting: false, e: null }, { isUpdating: false, e: e }, { isImageChanged: true, e: e }); updateLockStatusDisplay(true, false); // Show default lock state post-image loading}document.getElementById("imageLoader").addEventListener("change", handleImageChange);
const handleBarsAndCoordinates = (e) => { const isLocked = updateLockStatusDisplay(false, null); // Update lock status on mouse move if (!isLocked) { // Allow bar movement only if not locked update(false, { isInputting: false, e: null }, { isUpdating: true, e: e }, { isImageChanged: false, e: null }); }}document.addEventListener("mousemove", handleBarsAndCoordinates);
const updateCoordinateInput = (e) => { updateLockStatusDisplay(true, true); // Update lock status update(false, { isInputting: true, e: e }, { isUpdating: false, e: e }, { isImageChanged: false, e: null });}document.addEventListener("mousedown", updateCoordinateInput);
const unlockBar = (e) => { updateLockStatusDisplay(true, false); // Update lock status update(true, { isInputting: false, e: null }, { isUpdating: false, e: null }, { isImageChanged: false, e: null });}document.addEventListener("mouseup", unlockBar);
const updateLockStatusDisplay = (isUpdating, isLocking) => { let flg; if (isUpdating) { flg = isLocking; }
const lockStatusDisplay = document.getElementById("lockStatus"); // element to indicate lock state lockStatusDisplay.innerText = flg ? "Locking..." : "Releasing now."; lockStatusDisplay.style.color = flg ? "red" : "green"; // Change color based on lock status return flg;}
const copyToClipboard = (copyStatusesToCb, coordinateXUpper, coordinateYUpper, coordinateXLower, coordinateYLower) => { const sep = " "; const copyText = `${coordinateXUpper.value}${sep}${coordinateYUpper.value}${sep}${coordinateXLower.value}${sep}${coordinateYLower.value}`; navigator.clipboard.writeText(copyText).then(() => { const newElement = document.createElement("p"); newElement.textContent = "copied!"; copyStatusesToCb.insertAdjacentElement("afterend", newElement); setTimeout(() => { newElement.remove(); }, 1000); }, (err) => { console.error("Asynchronous clipboard write failed.", err); });}
const updateStateOfBarActivation = (indexOfActiveBar) => { const NUMBER_OF_BAR = 2; return (isBarStateUpdating, propsForCoordRecordInput, propsForUpdateCoordAndBar, propsForImageChanging) => { console.log("updateStateOfBarActivation(): updating state start."); if (isBarStateUpdating) { indexOfActiveBar += 1; if (indexOfActiveBar === NUMBER_OF_BAR) { indexOfActiveBar = 0; } } console.log("updateStateOfBarActivation(): the active bar is decided.");
const imageElement = document.getElementById("imageElement"); let coordinateXUpperToRecord = document.getElementById("coordinateXUpperDisplayToRecord"); let coordinateYUpperToRecord = document.getElementById("coordinateYUpperDisplayToRecord"); let coordinateXLowerToRecord = document.getElementById("coordinateXLowerDisplayToRecord"); let coordinateYLowerToRecord = document.getElementById("coordinateYLowerDisplayToRecord"); const copyStatusDisplayToCb = document.getElementById("copyToCb");
if (propsForCoordRecordInput.isInputting) { const imageRect = imageElement.getBoundingClientRect(); const x = propsForCoordRecordInput.e.clientX - imageRect.left; const y = propsForCoordRecordInput.e.clientY - imageRect.top; switch (indexOfActiveBar) { case 0: coordinateXUpperToRecord.value = `${x}`; coordinateYUpperToRecord.value = `${y}`; break; case 1: coordinateXLowerToRecord.value = `${x}`; coordinateYLowerToRecord.value = `${y}`; break; } copyToClipboard(copyStatusDisplayToCb, coordinateXUpperToRecord, coordinateYUpperToRecord, coordinateXLowerToRecord, coordinateYLowerToRecord); } console.log("updateStateOfBarActivation(): coordinates are recorded.");
const coordinateXUpperDisplay = document.getElementById("coordinateXUpperDisplay"); const coordinateYUpperDisplay = document.getElementById("coordinateYUpperDisplay"); const coordinateXLowerDisplay = document.getElementById("coordinateXLowerDisplay"); const coordinateYLowerDisplay = document.getElementById("coordinateYLowerDisplay"); const draggableBarXUpper = document.getElementById("draggableBarXUpper"); const draggableBarYUpper = document.getElementById("draggableBarYUpper"); const draggableBarXLower = document.getElementById("draggableBarXLower"); const draggableBarYLower = document.getElementById("draggableBarYLower");
if (propsForUpdateCoordAndBar.isUpdating) { const updateBarsAndCoordinates = (imgRect, ev, barX, barY, coordX, coordY) => { if (ev.clientX >= imgRect.left && ev.clientX <= imgRect.right && ev.clientY >= imgRect.top && ev.clientY <= imgRect.bottom) { // Track the bar to the mouse within the image barY.style.top = `${ev.clientY - imgRect.top}px`; barY.style.transform = 'translateY(-50%)'; // Always center align coordY.value = `${ev.clientY - imgRect.top}`;
barX.style.left = `${ev.clientX - imgRect.left}px`; coordX.value = `${ev.clientX - imgRect.left}`; } } const imageRect = imageElement.getBoundingClientRect(); let draggableBarX = draggableBarXUpper; let draggableBarY = draggableBarYUpper; let coordXDisplay = coordinateXUpperDisplay; let coordYDisplay = coordinateYUpperDisplay; switch (indexOfActiveBar) { case 0: // Nothing to do. break; case 1: draggableBarX = draggableBarXLower; draggableBarY = draggableBarYLower; coordXDisplay = coordinateXLowerDisplay; coordYDisplay = coordinateYLowerDisplay; break; } updateBarsAndCoordinates(imageRect, propsForUpdateCoordAndBar.e, draggableBarX, draggableBarY, coordXDisplay, coordYDisplay); } console.log("updateStateOfBarActivation(): bars and coordinates are updated.");
console.log(propsForImageChanging) if (propsForImageChanging.isImageChanged) { const selectedImage = propsForImageChanging.e.target.files[0]; if (!selectedImage) return; const reader = new FileReader(); reader.onload = (event) => { imageElement.src = event.target.result; // Initialize bar after image load draggableBarYUpper.style.top = "50%"; // Align to image center draggableBarYUpper.style.transform = "translateY(-50%)"; draggableBarXUpper.style.left = "0px"; // Align to image left edge coordinateXUpperDisplay.value = "0"; coordinateYUpperDisplay.value = `${(imageElement.offsetHeight / 2)}`; }; reader.readAsDataURL(selectedImage); } console.log("updateStateOfBarActivation(): image is loaded.");
console.log("updateStateOfBarActivation(): updating state finished.") }}
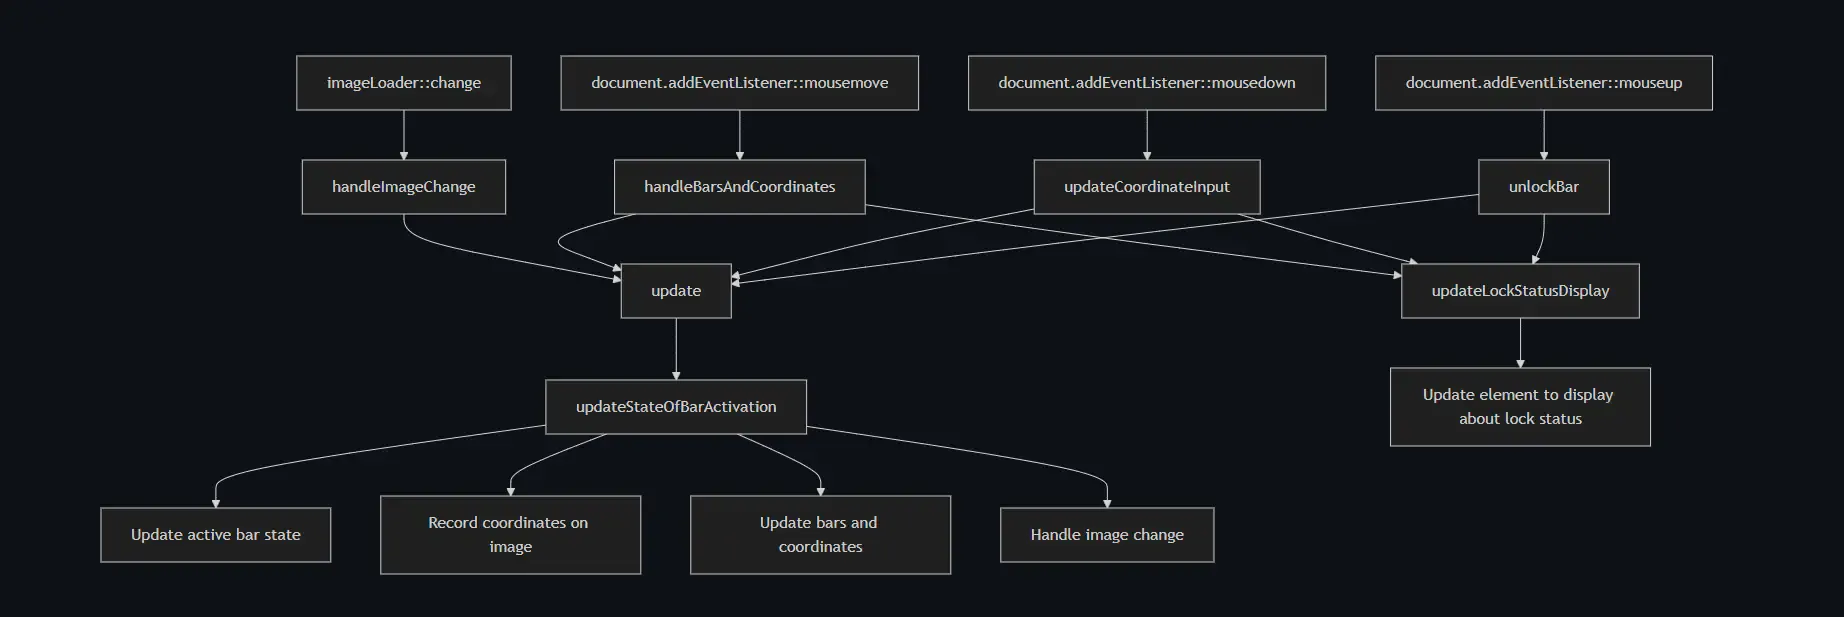
const update = updateStateOfBarActivation(0);このトリミングツールのJavaScriptの関数の依存関係の見取り図はこんな感じです。とりあえず、要素の状態が切り替わる処理をupdateStateOfBarActivation関数に全て集めて、イベント関数からその関数に向かって「何を変えるのか」を一点集中させました。
生成AIが作ったコードはマズイ
いやー久しぶりにHTMLとピュアJavaScriptを組んでみて、というか生成AIに組ませたらとんでもないことになりましたね。どの要素がどうなってんだか全く追えないコードに成り果てていました。(+д+)マズー
(Gitに履歴が残っていました。AI君が作ったものを半分ぐらい直した状態でした。どの要素をどの処理で使っているのかが全然追えない・・・。)なんか普段、バックエンドのコードを書くことが多いので、フロントエンドのコードだと現時点での生成AIには手に追えなさそうですね・・・、まあライブラリとAPIを教えてくれるのは有り難いですけど。
// script.js - 画像読み込みとマウス追従バーの実装let imageElement = document.getElementById("imageElement");let draggableBarXUpper = document.getElementById("draggableBarXUpper");let draggableBarYUpper = document.getElementById("draggableBarYUpper");let draggableBarXLower = document.getElementById("draggableBarXLower");let draggableBarYLower = document.getElementById("draggableBarYLower");let coordinateXUpperDisplay = document.getElementById("coordinateXUpperDisplay");let coordinateYUpperDisplay = document.getElementById("coordinateYUpperDisplay");let coordinateXLowerDisplay = document.getElementById("coordinateXLowerDisplay");let coordinateYLowerDisplay = document.getElementById("coordinateYLowerDisplay");let coordinateXUpperDisplayToRecord = document.getElementById("coordinateXUpperDisplayToRecord");let coordinateYUpperDisplayToRecord = document.getElementById("coordinateYUpperDisplayToRecord");let coordinateXLowerDisplayToRecord = document.getElementById("coordinateXLowerDisplayToRecord");let coordinateYLowerDisplayToRecord = document.getElementById("coordinateYLowerDisplayToRecord");let lockStatusDisplay = document.getElementById("lockStatus"); // ロック状態表示用要素let isBarLocked = false; // バーがロックされているかどうかのフラグlet indexOfActiveBar = 0;let copyToCbStatusDisplay = document.getElementById("copyToCb");
document.getElementById("imageLoader").addEventListener("change", handleImageChange);
document.addEventListener("mousemove", (e) => {
if (!isBarLocked) { // Allow bar movement only if not locked const updateBarsAndCoordinates = (imgRect, ev, barX, barY, coordX, coordY) => { if (ev.clientX >= imgRect.left && e.clientX <= imgRect.right && ev.clientY >= imgRect.top && e.clientY <= imgRect.bottom) { // Track the bar to the mouse within the image barY.style.top = `${ev.clientY - imgRect.top}px`; barY.style.transform = 'translateY(-50%)'; // Always center align coordY.value = `${ev.clientY - imgRect.top}`;
barX.style.left = `${e.clientX - imgRect.left}px`; coordX.value = `${ev.clientX - imgRect.left}`; } }
const imageRect = imageElement.getBoundingClientRect(); let draggableBarX = draggableBarXUpper; let draggableBarY = draggableBarYUpper; let coordXDisplay = coordinateXUpperDisplay; let coordYDisplay = coordinateYUpperDisplay; switch (indexOfActiveBar) { case 0: // Nothing to do. break; case 1: draggableBarX = draggableBarXLower; draggableBarY = draggableBarYLower; coordXDisplay = coordinateXLowerDisplay; coordYDisplay = coordinateYLowerDisplay; break; } updateBarsAndCoordinates(imageRect, e, draggableBarX, draggableBarY, coordXDisplay, coordYDisplay);
} updateLockStatusDisplay(); // Update lock status on mouse move});
document.addEventListener("mousedown", (e) => { isBarLocked = true; // Lock the bar upon click updateLockStatusDisplay(); // Update lock status updateCoordinateInput(e); // Update click coordinates in input field copyToClipboard();});
document.addEventListener("mouseup", () => { isBarLocked = false; // Unlock on click release const update = updateStateOfBarActivation(); update(true, { isInputting: false, x: null, y: null }); updateLockStatusDisplay(); // Update lock status});
function updateStateOfBarActivation() { const NUMBER_OF_BAR = 2; // let idx = 0; return function (isBarStateUpdating, propsForCoordRecordInput) { if (isBarStateUpdating) { indexOfActiveBar += 1; if (indexOfActiveBar === NUMBER_OF_BAR) { indexOfActiveBar = 0; } } if (propsForCoordRecordInput.isInputting) { switch (indexOfActiveBar) { case 0: coordinateXUpperDisplayToRecord.value = `${propsForCoordRecordInput.x}`; coordinateYUpperDisplayToRecord.value = `${propsForCoordRecordInput.y}`; break; case 1: coordinateXLowerDisplayToRecord.value = `${propsForCoordRecordInput.x}`; coordinateYLowerDisplayToRecord.value = `${propsForCoordRecordInput.y}`; break; } }
}}
function updateLockStatusDisplay() { lockStatusDisplay.innerText = isBarLocked ? "Locking..." : "Releasing now."; lockStatusDisplay.style.color = isBarLocked ? "red" : "green"; // Change color based on lock status}
function updateCoordinateInput(e) { const imageRect = imageElement.getBoundingClientRect(); const x = e.clientX - imageRect.left; const y = e.clientY - imageRect.top; const update = updateStateOfBarActivation(); update(false, { isInputting: true, x: x, y: y });}
function handleImageChange(e) { const selectedImage = e.target.files[0]; if (!selectedImage) return; const reader = new FileReader(); reader.onload = (event) => { imageElement.src = event.target.result; // Initialize bar after image load draggableBarYUpper.style.top = "50%"; // Align to image center draggableBarYUpper.style.transform = "translateY(-50%)"; draggableBarXUpper.style.left = "0px"; // Align to image left edge coordinateXUpperDisplay.value = "0"; coordinateYUpperDisplay.value = `${(imageElement.offsetHeight / 2)}`; updateLockStatusDisplay(); // Show default lock state post-image loading }; reader.readAsDataURL(selectedImage);}
function copyToClipboard() { let copyText = `${coordinateXUpperDisplayToRecord.value},${coordinateYUpperDisplayToRecord.value},${coordinateXLowerDisplayToRecord.value},${coordinateYLowerDisplayToRecord.value}`; navigator.clipboard.writeText(copyText).then(function () { const newElement = document.createElement("p"); newElement.textContent = "copied!"; copyToCbStatusDisplay.insertAdjacentElement("afterend", newElement); setTimeout(() => { newElement.remove(); }, 1000); }, function (err) { console.error("Asynchronous clipboard write failed.", err); });}HTMLとJavaScriptの処理の流れ
先程のMermaidによる依存関係の図をもう一度貼っておいて、処理の流れを見てみます。動かす時の参考にしてみてください。
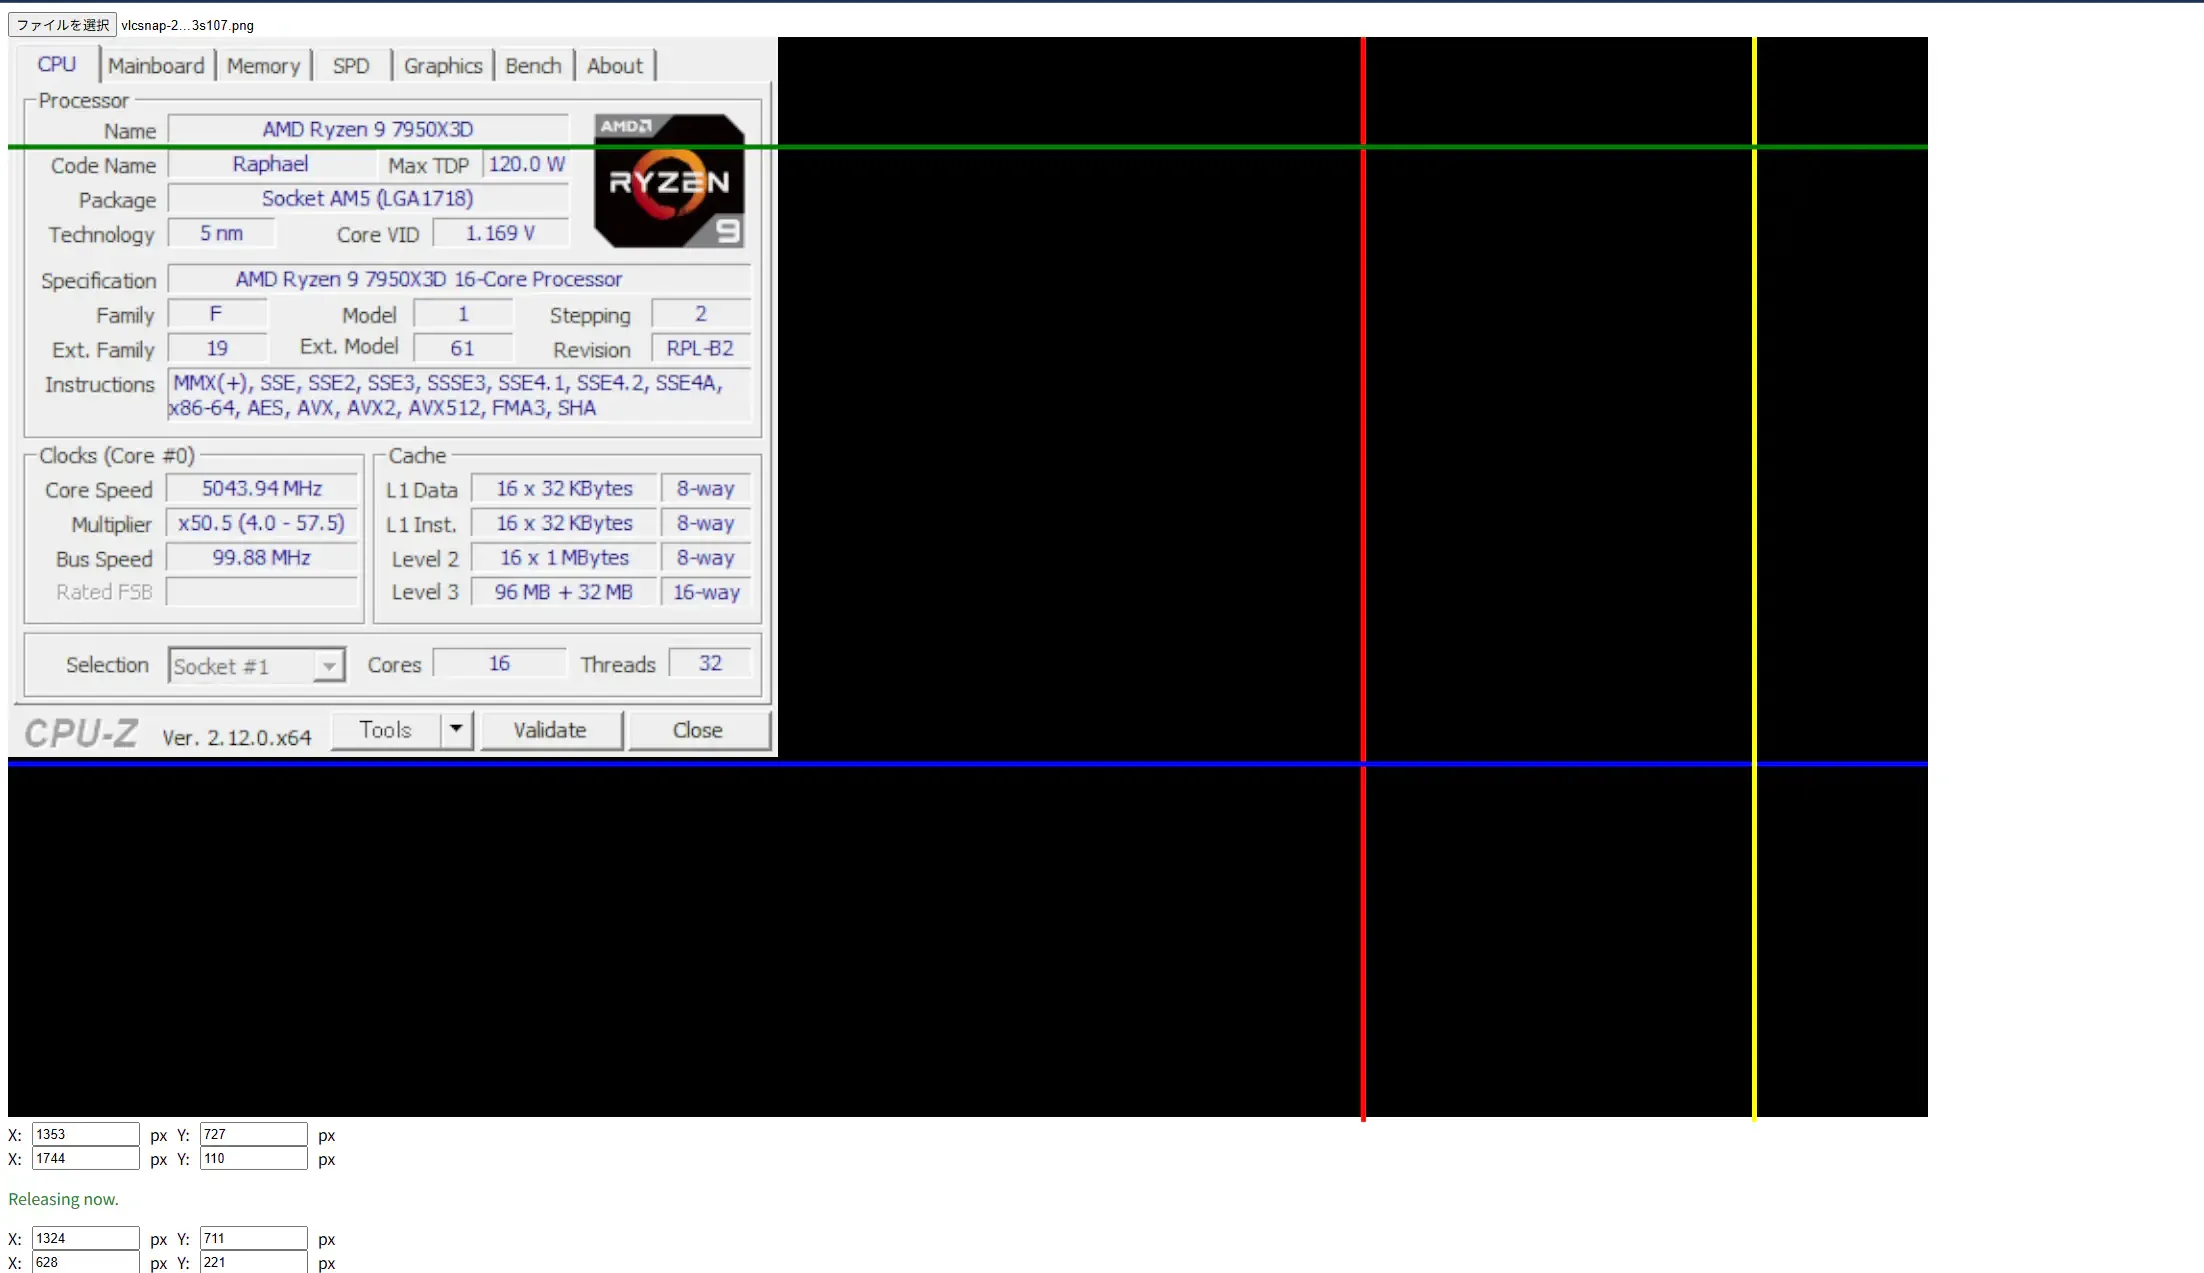
下記の画像は先程冒頭で載せたものと同じものです。処理の流れは簡単に言うとこんな感じです。
- 画像を選んで読み込む。
- バーが動かせるので適当に動かして好きな場所でクリックする。
- 赤と青のバーが動かせる時にクリックすると、左側と上側の座標が記録される。(記録するテキストボックスは画面の左下にあります。)
- 黄色と緑のバーが動かせる時にクリックすると、右側と下側の座標が記録される。(記録するテキストボックスは画面の左下にあります。)
- 記録した時と同時にクリップボードに、左側と上側と右側と下側の4つの座標が記録されます。
トリミングする位置を可視化しながら取得できるツールはこんな感じです。 このツールで取得した4つの座標を、次のトリミングツールで使うというわけです。
PowerShellによる画像のトリミング
PowerShellの処理の概観
それでは、先程HTMLで可視化してクリップボードに出力した座標を使って、画像をトリミングしていきたいと思います。 今回は、座標が半角スペース刻みでクリップボードに貼られたので、それをコマンドの引数としてペタッと貼り付ければ実行できるようにしました。 まず、バッチファイルはこんな感じにしておきます。
@echo offsetlocal
set /p coordinates="Input 4 coordinates separated by 'spaces' to trim images (lefter-x, upper-y, righter-x, lower-y): "
:: coordinates are plotted on %1 %2 %3 %4.Start /WAIT Powershell -Windowstyle Normal -NoProfile -ExecutionPolicy Unrestricted -File ".\Z5-4_trim_multiple_images_by_coordinates.ps1" %coordinates%
endlocalそして、バッチファイルから実行するPowerShellの中身は、こんな感じで実装されています。
Z5-4_trim_multiple_images_by_coordinates.ps1
function Optimize-ImageWithTrimming([string]$srcBmpAbsName, [int]$xCoord01, [int]$yCoord01, [int]$xCoord02, [int]$yCoord02, [string]$suffix) { # Load assembly of .NET Framework Add-Type -AssemblyName System.Drawing; $srcFile = Get-Item -Path $srcBmpAbsName; $srcBmp = New-Object System.Drawing.Bitmap($srcBmpAbsName); $srcRect = New-Object System.Drawing.Rectangle([System.UInt32]0, [System.UInt32]0, [System.UInt32]$srcBmp.Width, [System.UInt32]$srcBmp.Height); $srcBmpData = $srcBmp.LockBits($srcRect, [Drawing.Imaging.ImageLockMode]::ReadOnly, $srcBmp.PixelFormat); try { # Set an area to trim and clone an image. $dstRect = New-Object System.Drawing.Rectangle([System.UInt32]$xCoord01, [System.UInt32]$yCoord01, [System.UInt32]$xCoord02, [System.UInt32]$yCoord02); Write-Host ("{0}: cloning source bitmap.`n" -f $MyInvocation.MyCommand.Name); $dstBmp = $srcBmp.Clone($dstRect, $srcBmpData.PixelFormat);
# Trim an image and save $dstBmpName = "{0}\{1}_{2:D2}{3}" -f (Get-Location).Path, $srcFile.BaseName, $suffix, $srcFile.Extension; Write-Host ("{0}: name of the image file being saved is '{1}'.`n" -f $MyInvocation.MyCommand.Name, $dstBmpName); $dstBmp.Save($dstBmpName, [System.Drawing.Imaging.ImageFormat]::Png);
Write-Host ("{0}: trimmed image is saved.`n" -f $MyInvocation.MyCommand.Name); Write-Output $dstBmpName; } catch [System.OutOfMemoryException] { Write-Error -Message "OutOfMemoryException: remove trimmed images..."; } finally { try { Write-Host ("{0}: unlock bits of source bitmap.`n" -f $MyInvocation.MyCommand.Name); $srcBmp.UnlockBits($srcBmpData); } catch [System.Runtime.InteropServices.ExternalException] { <#Do this if a terminating exception happens#> Write-Error -Message "GDI+ generic error occurred..."; } finally { Write-Host ("{0}: dispose source bitmap.`n" -f $MyInvocation.MyCommand.Name); $srcBmp.Dispose(); Write-Host ("{0}: post-processing finished.`n" -f $MyInvocation.MyCommand.Name); } }}
function Optimize-ImagesWithTrimming([array]$pathList, [int]$xCoordinate01, [int]$yCoordinate01, [int]$xCoordinate02, [int]$yCoordinate02, [string]$suffix) { # Get image files to trim. Write-Host ("{0}: output 'pathList'`n" -f $MyInvocation.MyCommand.Name); Write-Output $pathList; try { foreach ($path in $pathList) { Write-Host ("{0}: showing item info.`n" -f $MyInvocation.MyCommand.Name); Write-Output $path; Write-Output $path.GetType().FullName; Write-Output $path.FullName.GetType().FullName; Write-Output $path.FullName;
$imagePath = $path.FullName; Write-Host ("{0}: start trimming image of '{1}'`n" -f $MyInvocation.MyCommand.Name, $imagePath); Optimize-ImageWithTrimming $imagePath $xCoordinate01 $yCoordinate01 $xCoordinate02 $yCoordinate02 $suffix; Write-Host ("{0}: trimming 1 image is finished.`n" -f $MyInvocation.MyCommand.Name); } } finally { # Nothing to do }}
$targetFolder = (Get-Location).Path;$imgPathList = Get-ChildItem -Path $targetFolder | Where-Object { $_.Extension -in @(".png", ".jpg") };$xCoordinateToTrim01 = $Args[0];$yCoordinateToTrim01 = $Args[1];$xCoordinateToTrim02 = $Args[2];$yCoordinateToTrim02 = $Args[3];$suffix = "trimmed";
Optimize-ImagesWithTrimming $imgPathList $xCoordinateToTrim01 $yCoordinateToTrim01 $xCoordinateToTrim02 $yCoordinateToTrim02 $suffix;
$tmp = Read-Host "Input 'y' to move source files and terminate this process......";If ($tmp -eq "y") { $folderName = ".\5_original_files"; If (!(Test-path $targetFolder\$folderName)) { New-Item -Name $folderName -ItemType Directory; } Move-Item -Path .\*.png -Destination $folderName -Exclude *$suffix*; Move-Item -Path .\*.jpg -Destination $folderName -Exclude *$suffix*;}PowerShellの処理の流れ
このツールが一体何をやっているのかと言うと、流れ的にはこんな感じです。
- 1つのディレクトリ内にある画像を一覧で取得する。
- 1枚1枚の画像に対してトリミングを始める。
- 元画像のピクセルをロックする。
.NET FrameworkのSystem.Drawing.Rectangle構造体にSystem.UInt32の型の座標を渡す。- 元画像と同じ画像オブジェクトをクローンする。
- 渡した座標でトリミングした画像を保存する。
画像のトリミング方法は以前にこの記事でも紹介しました。
今回も、上記の3~6の流れは殆ど一緒です。
しかし今回は、例外が起きても処理が止まらないツールを作りたかったので、処理を止めないようにcatchした例外が2つありました。System.Runtime.InteropServices.ExternalExceptionとSystem.OutOfMemoryExceptionの例外です。
ExternalExceptionをWrite-Errorでやり過ごす。
System.Runtime.InteropServices.ExternalExceptionは、「GDI+ 汎用エラーが発生しました。」という旨の例外です。これは、開発中に予期しないエラーが発生して、Bitmap.Disposeのメソッドを実行し損ねると、同様の処理を次回に実行した時に起こる例外です。メモリ上に、「GDIオブジェクト」というものが残存してしまうことが原因なのですが、タスクマネージャーでも特定するのが難しく、最終的には再起動しないと取り除けない例外です。
なので、処理をミスった都度PCを再起動するのは面倒なので、例外をcatchしてトリミング処理をいつでも出来るようにしたいわけです。
finally { try { Write-Host ("{0}: unlock bits of source bitmap.`n" -f $MyInvocation.MyCommand.Name); $srcBmp.UnlockBits($srcBmpData); } catch [System.Runtime.InteropServices.ExternalException] { <#Do this if a terminating exception happens#> Write-Error -Message "GDI+ generic error occurred..."; } finally { Write-Host ("{0}: dispose source bitmap.`n" -f $MyInvocation.MyCommand.Name); $srcBmp.Dispose(); Write-Host ("{0}: post-processing finished.`n" -f $MyInvocation.MyCommand.Name); }}そこで使ったのが、catchしてからWrite-Errorコマンドレットです。
このコマンドレットは、他の言語のthrowのようにエラーが起きたことを知らせられるのですが、知らせながらも処理を止めないことが出来るというものです。このコマンドレットを使って、「GDI+ 汎用エラーが発生しました。」という旨の例外を検知した時には、その発生をログに残しながら処理を続けられるようになりました。
OutOfMemoryExceptionをWrite-Errorでやり過ごす。
「System.OutOfMemoryException」の例外は、今回のツールで言うと、既にトリミングした画像を、さらに同じ座標でトリミングしようとすると起こる例外です。なので、この場合は「既にトリミングした画像は消してね。」的なエラーメッセージを表示させて、トリミング処理をとりあえず実行し切るようにします。
try { # Set an area to trim and clone an image. $dstRect = New-Object System.Drawing.Rectangle([System.UInt32]$xCoord01, [System.UInt32]$yCoord01, [System.UInt32]$xCoord02, [System.UInt32]$yCoord02); Write-Host ("{0}: cloning source bitmap.`n" -f $MyInvocation.MyCommand.Name); $dstBmp = $srcBmp.Clone($dstRect, $srcBmpData.PixelFormat);
# Trim an image and save $dstBmpName = "{0}\{1}_{2:D2}{3}" -f (Get-Location).Path, $srcFile.BaseName, $suffix, $srcFile.Extension; Write-Host ("{0}: name of the image file being saved is '{1}'.`n" -f $MyInvocation.MyCommand.Name, $dstBmpName); $dstBmp.Save($dstBmpName, [System.Drawing.Imaging.ImageFormat]::Png);
Write-Host ("{0}: trimmed image is saved.`n" -f $MyInvocation.MyCommand.Name); Write-Output $dstBmpName;}catch [System.OutOfMemoryException] { Write-Error -Message "OutOfMemoryException: remove trimmed images...";}PowerShellの例外処理はクセが強い
本当にクセが強い言語です、PowerShellは。
今回も例外処理の部分で沼りかけました。うーん、PowerShellには汎用的な例外をキャッチする処理は無いんですかねえ? 下記のMicrosoft公式の「例外について知りたかったことのすべて」を読むのが面倒くさくて、結局「catch ブロックで実行するのが同じ例外の throw のみである場合は、catch しないでください。」の部分を汲み取って、catchしないで例外の原因を特定して、その例外に対して個別にcatchして流せるようにしました。一応これで既知の例外と未知の例外の両方を検知して処理を続行できるようにはなりました。
と思ったのですが、もしも既知の例外に引っ掛かった例外の中に、自分が想定していない例外が混ざる可能性があったら・・・と考えると、デバッグに少々難がありますねえ・・・。
このトリミングツールを使ってみる。
それでは、このトリミングツールを使ってみます。
先程、このような画面でトリミングする座標を決めるとしました。
そしてこのようなディレクトリ構造があるとして・・・
\│ Z5-3_describe_position_to_trim_images.bat│ Z5-4_trim_multiple_images_by_coordinates.bat│ Z5-4_trim_multiple_images_by_coordinates.ps1├─image_trimmer│ index.html│ script.js│ style.css│ a.png│ b.png│ c.pngHTMLから取得した座標を使ってPowerShellを実行すると、
# Input 4 coordinates separated by 'spaces' to trim images (lefter-x, upper-y, righter-x, lower-y):0 0 767 724
# こんな風にPowerShellが実行される。Start /WAIT Powershell -Windowstyle Normal -NoProfile -ExecutionPolicy Unrestricted -File ".\Z5-4_trim_multiple_images_by_coordinates.ps1" 0 0 767 724このように同様にトリミングしたい画像も・・・、
同様にトリミングされるというわけです。
まとめ
今回は、HTMLで画像の不要な部分を座標に表して、PowerShellでその数値を使ってトリミングするツールの紹介でした。
以下、本記事のまとめです。
- HTMLに
divタグを設置して、JavaScriptを使って画像の上でバーを動かせる。そして、座標を取得する。 - 生成AIが作ったコードはとんでもないものになってたりするので、一旦リファクタリングするべきかどうかを確認する。
- PowerShellでは、「.NET Framework」の
System.Drawing.Rectangle構造体にSystem.UInt32の型の座標を渡してトリミングしていく。 Bitmap.Dispose忘れによって起こる、ExternalExceptionをWrite-Errorでやり過ごした。- 過度なトリミングによって起こる、
OutOfMemoryExceptionをWrite-Errorでやり過ごした。
これで同じ部分が要らないまとまった画像を一気にトリミングできるようになりました。自分が所持している画像のサイズを小さくすることが出来ますね。
PowerShell関連記事
その他のPowerShell関連の記事を貼っておきます。
おしまい

以上になります!
記事を共有
この記事が役に立ったなら、ぜひ他の人と共有してください!
音楽
再生中なし