


【Node.js】GitHub ActionsでREADME.mdに投稿した記事のリンクを表示する(FirebaseでCORS対応)

はじまり


作ったもの
今回、以下のREADME.mdで言うところの赤枠の部分を表示するために色々開発しました。
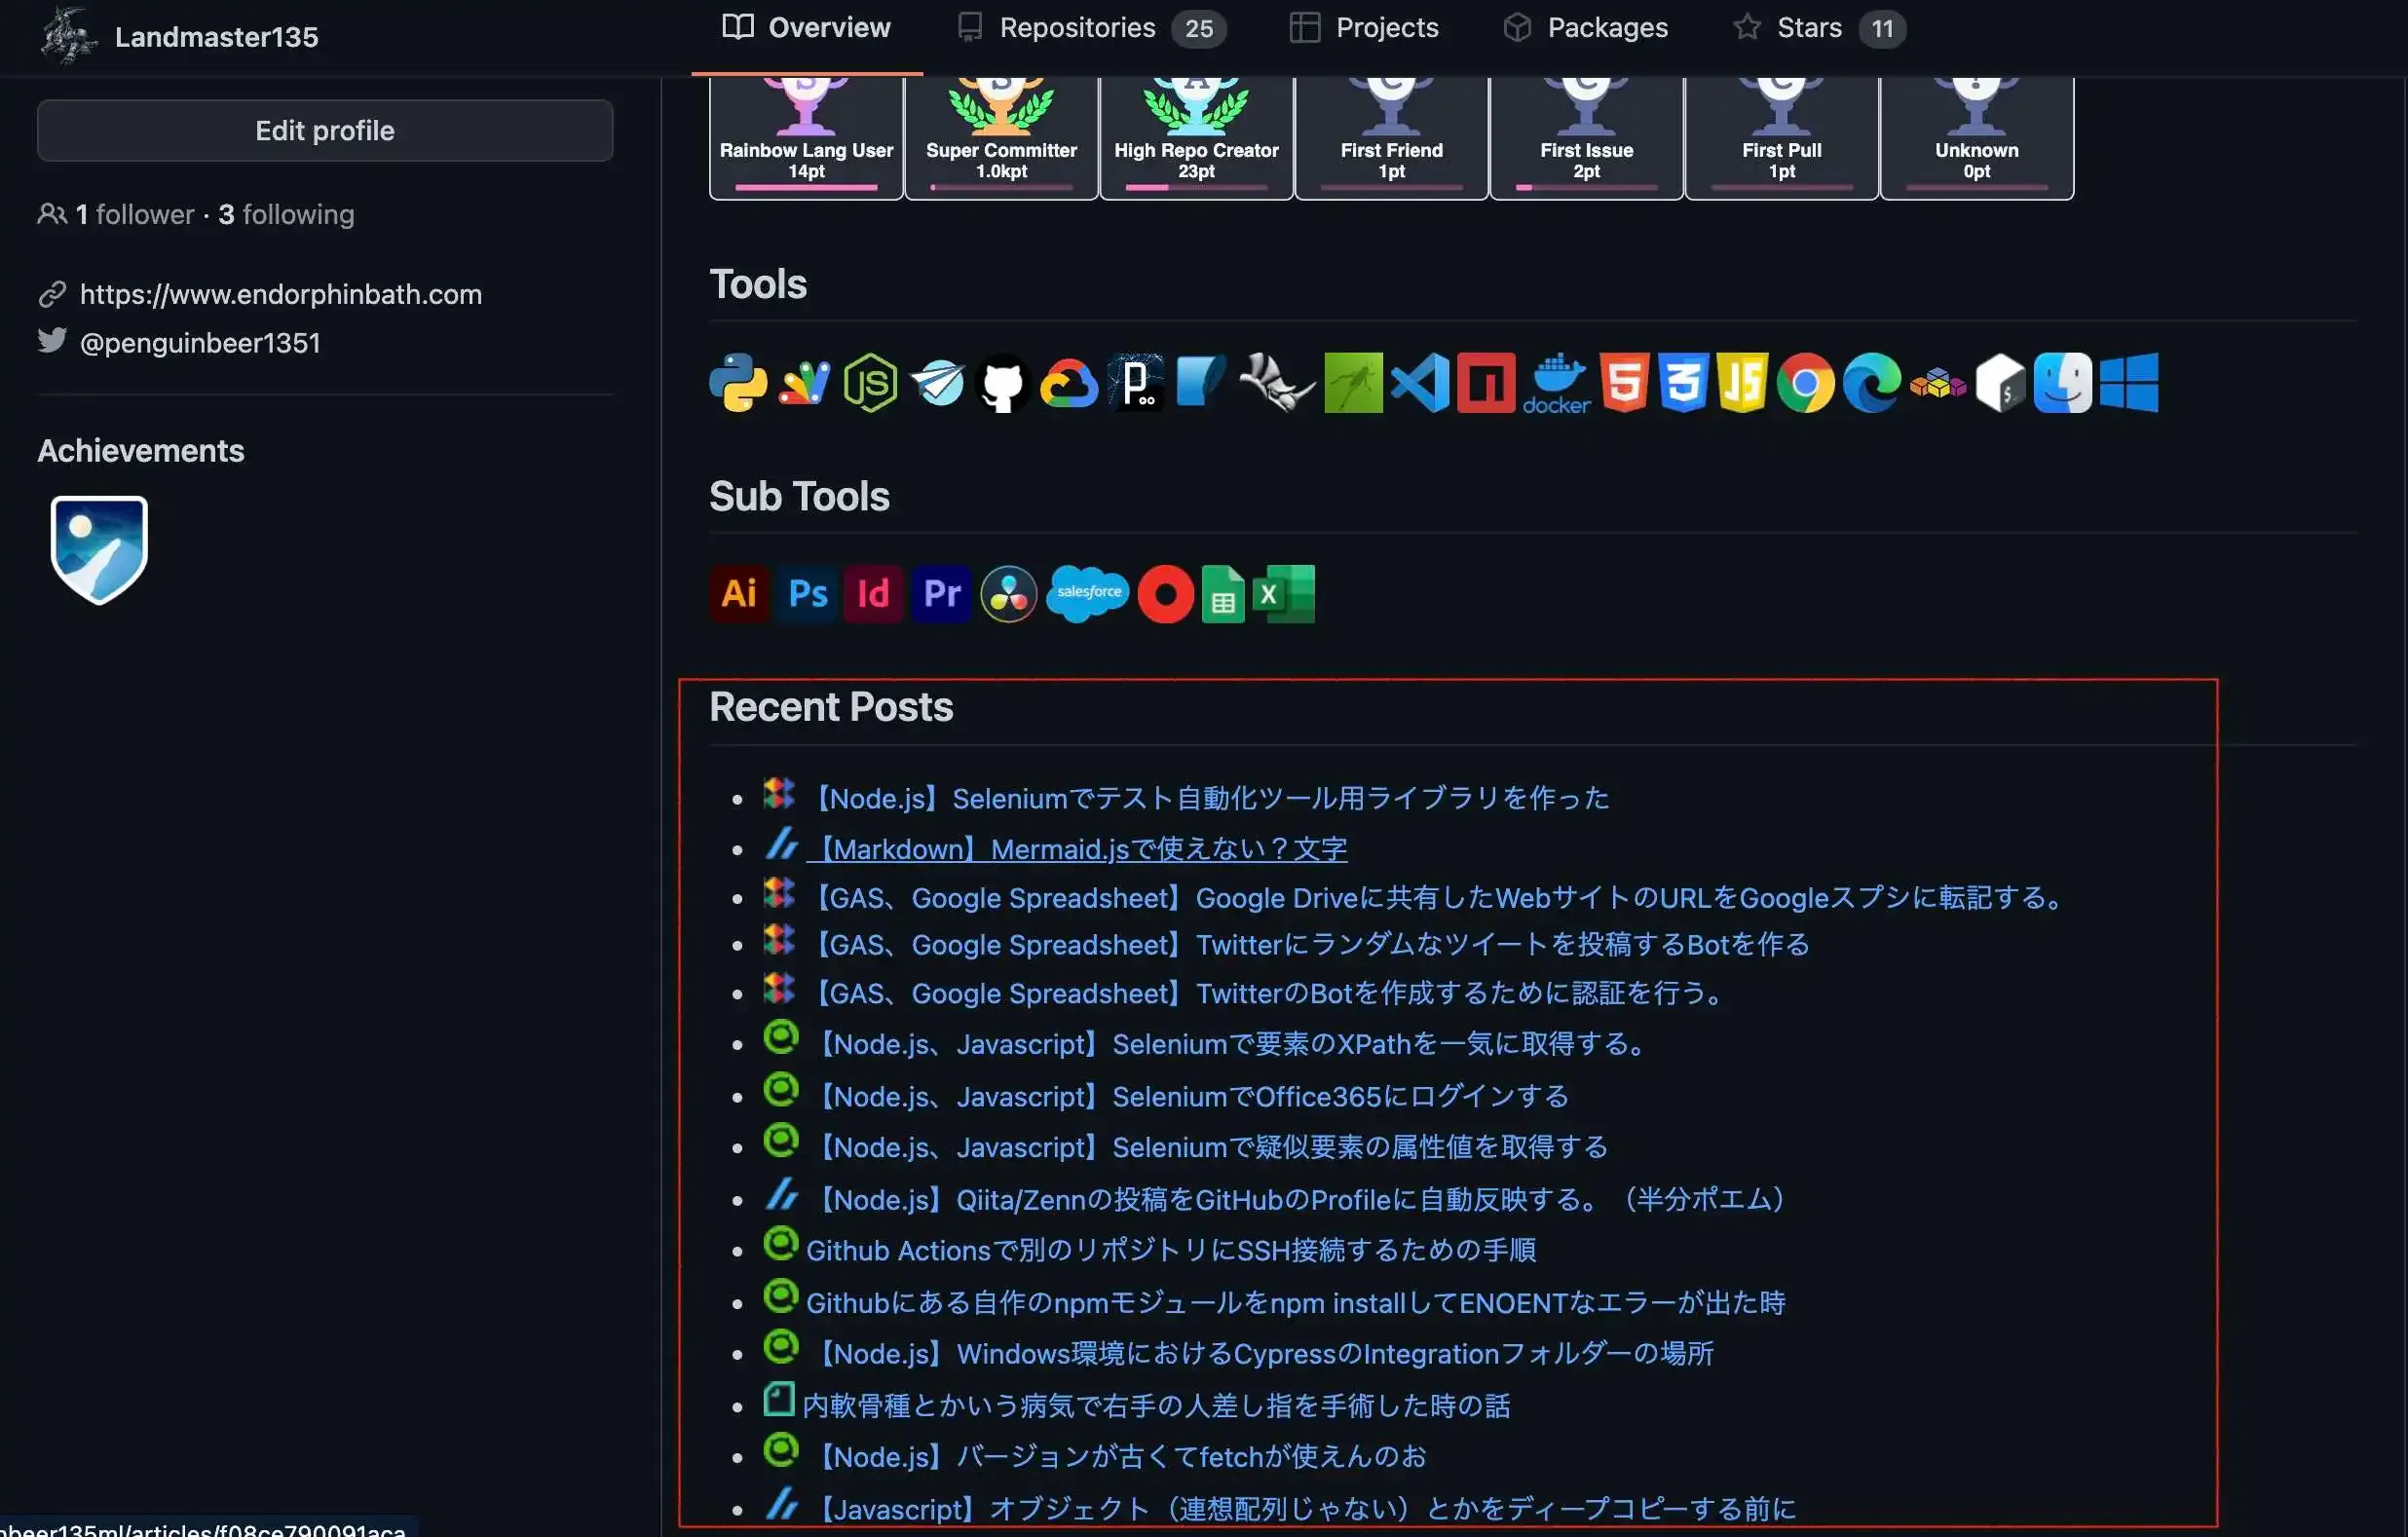
このREADM.mdを更新するアプリを作成するために行ったことは、以下になります。各記事投稿サービスは、Zenn、Qiita、ブログ(WordPress)、noteを対象としています。
- Node.jsにより、各記事投稿サービスのRSS Feedから必要な情報を取得する処理を作る。
- 先程作った処理を、GitHub Actionsとして機能するようにする。
- noteのRSS Feedを取得するために、CORS対応のCloud Functionを作って、noteのEndpointはそのCloud Functionにする。
今回作ったアプリの概要図はこちらになります。初めて触るものばかりでしたし、この概要図も初めてmermaid.jsを使って、初めて尽くしの開発でした。
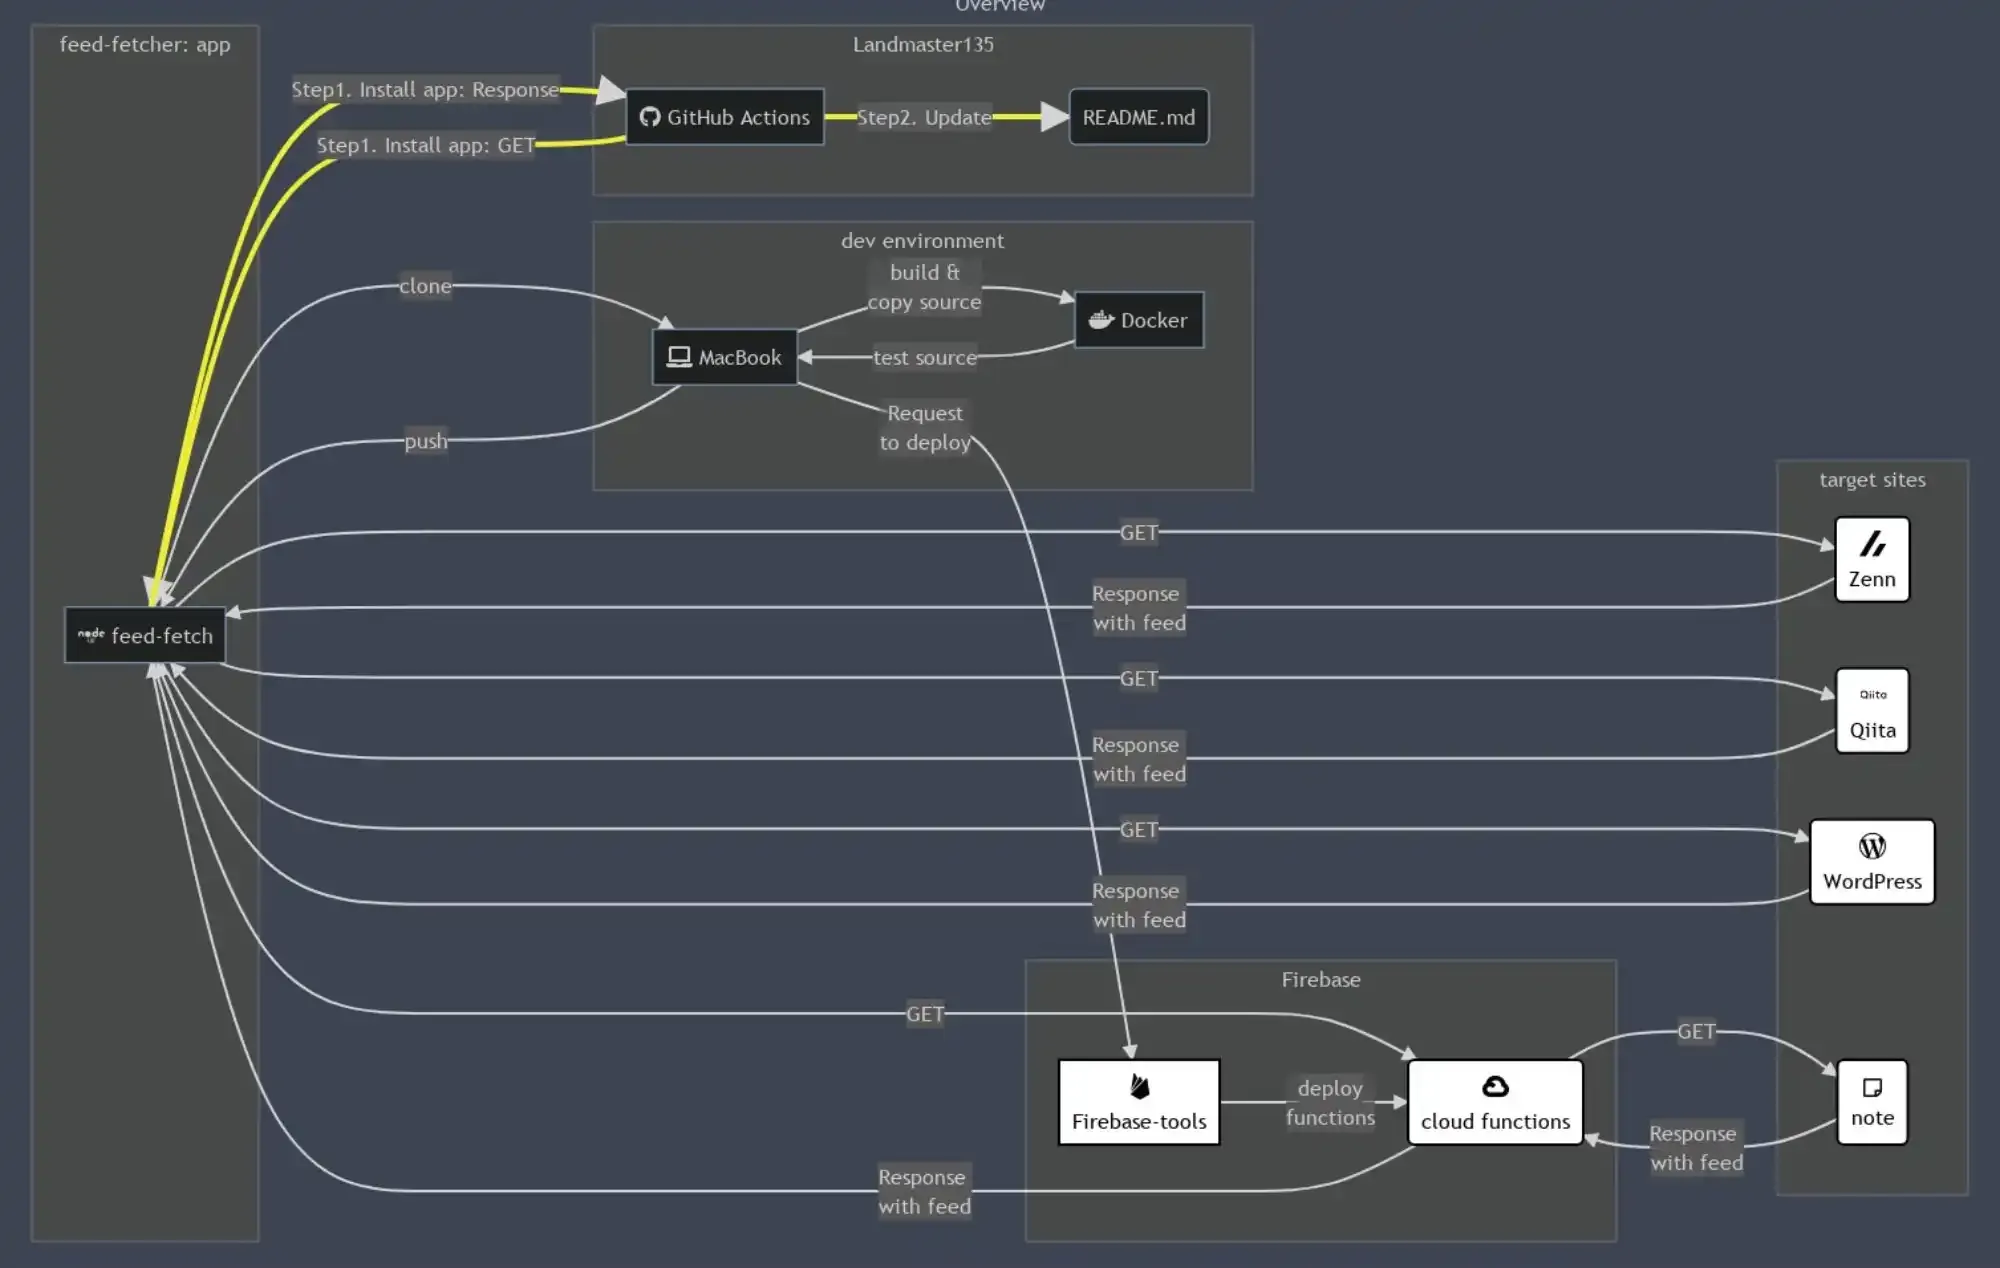
今回作ったアプリのソースは、GitHub上で公開しています。よければ見ていってください。
作成の流れ
1. Node.jsにより、各記事投稿サービスのRSS Feedから必要な情報を取得する処理を作る。
今回の処理は、Node.jsで作りました。メイン処理はこちらになります。
feed-fetch.js:
import path from 'path';import url from 'url';
import { Command } from 'commander';
import * as methods from './lib/lib-methods.js';
try { (async() => { const commander = new Command(); commander.option('-c, --config-yaml <type>', 'file name for config with yaml').parse(process.argv); console.log(commander);
const yamlFileName = String(commander._optionValues.configYaml); console.log(`feed-fetch.js: yamlFileName is "${yamlFileName}"`);
const __dirname = path.dirname(url.fileURLToPath(import.meta.url)); const configByYaml = methods.loadYamlFile(path.join(__dirname, yamlFileName)); console.log(configByYaml);
const number_of_display = configByYaml.displayLimit; const feedUrlArray = configByYaml.feedUrlArray; const imgFileNameArray = configByYaml.imgFileNameArray; let listOfLatestFeed = await methods.getLatestFeed(number_of_display, feedUrlArray, imgFileNameArray); console.log(listOfLatestFeed);
const sourceMdFileName = configByYaml.sourceMarkdownFileName; const lines = methods.getTextLines(sourceMdFileName); console.log(lines);
const postArea = configByYaml.postArea; methods.writeFeedToText(lines, sourceMdFileName, postArea, listOfLatestFeed, feedUrlArray, imgFileNameArray); console.log(methods.getTextLines(sourceMdFileName)); })();} catch (error) { console.error(`Execute Step 1:${error}`);}この処理の流れは、以下になります。
- 引数に貰ったyamlファイルからこの処理に必要なコンフィグ情報を取得する。(
console.log(configByYaml);までの部分) - 最近投稿した記事の一覧をyamlファイルに書いてあった分だけ、取得する。(
console.log(listOfLatestFeed);までの部分です。[title, pubDate, link, imgFileName]を1レコードとして取得。) - yamlファイルで取得した更新対象のファイルの全文を取得する。(
console.log(lines);までの部分) - 更新対象のファイルの投稿部分の表示だけ書き換える。(最後らへん)
そして、コンフィグ情報は以下のファイルの中身です。
そこに記載する配列feedUrlArrayおよびimgFileNameArrayのインデックスの順番は対応している必要があります。この場合だと、README.mdの中に<!--[START POSTS LIST]-->と<!--[END POSTS LIST]-->を記載すると、その間に投稿した記事の情報が更新されます。
configOfFeedFetcher.yml:
displayLimit: 15feedUrlArray: - https://zenn.dev/kinkinbeer135ml/feed - https://qiita.com/Landmaster135/feed.atom - https://www.endorphinbath.com/feed - https://us-central1-projectbeer15-37257.cloudfunctions.net/api/allimgFileNameArray: - img/zenn.png - img/qiita.png - img/endorphinbath.png - img/note.pngsourceMarkdownFileName: README.mdpostArea: start: <!--[START POSTS LIST]--> end: <!--[END POSTS LIST]-->noteのエンドポイントに関しては、3.で説明します。
2. 先程作った処理を、GitHub Actionsとして機能するようにする。
1.で作った処理を、GitHub Actionsとして動かすことにしました。
./node_modules/feed-fetcher/bin/runFeedFetch --config-yaml=../../configOfFeedFetcher.ymlの部分で投稿した記事の部分を更新しています。
name: Update README for RSS feed
on: workflow_dispatch: schedule: - cron: '0 0 * * *'
jobs: updateFeed: runs-on: ubuntu-latest steps: - name: apt update run: sudo apt update
- name: Checkout uses: actions/checkout@v2
- name: node set up uses: actions/setup-node@v2 with: node-version: '16.13.1'
- name: Confirm version of node and npm run: | node -v npm -v - name: Install feedFetcher run: npm install https://github.com/Landmaster135/feed-fetcher
- name: run feedFetcher run: | chmod 777 ./node_modules/feed-fetcher/bin/* ./node_modules/feed-fetcher/bin/runFeedFetch --config-yaml=../../configOfFeedFetcher.yml ./node_modules/feed-fetcher/bin/runImageScale --config-yaml=../../configOfImageScaler.yml
- name: git setting run: | git config --local user.email "52403447+Landmaster135@users.noreply.github.com" git config --local user.name "Landmaster135"
- name: git commit run: | git log -1 git add README.md git diff --cached --quiet || (git commit -m "Update feed snippet" && git push origin main)./node_modules/feed-fetcher/bin/runImageScale --config-yaml=../../configOfImageScaler.ymlの部分は別の記事で紹介しています。
3. noteのRSS Feedを取得するために、CORS対応のCloud Functionを作って、noteのEndpointはそのCloud Functionにする。
1.で作成したyamlファイルはこの通りになっていますが、noteのURLの部分だけはCloud Functionのエンドポイントになっています。
configOfFeedFetcher.yml:
displayLimit: 15feedUrlArray: - https://zenn.dev/kinkinbeer135ml/feed - https://qiita.com/Landmaster135/feed.atom - https://www.endorphinbath.com/feed - https://us-central1-projectbeer15-37257.cloudfunctions.net/api/allimgFileNameArray: - img/zenn.png - img/qiita.png - img/endorphinbath.png - img/note.pngsourceMarkdownFileName: README.mdpostArea: start: <!--[START POSTS LIST]--> end: <!--[END POSTS LIST]-->なぜCloud Functionを噛ませているかというと、noteのRSSのURL(僕の場合だと、https://note.com/kinkinbeer135ml/rss)からRSS Feedを取得しようとすると、弾かれてしまうためです。根本原因はnoteのRSSがCORS対応していないことです。
そのため、noteのRSSとfeed-fetcherアプリの間に、CORS対応の中間アプリを設置する必要がありました。 その中間アプリを作る際に、この記事がすごい参考になったので、貼っておきます。

4. Firebaseセットアップ時の備忘録
しかし、環境整備の際にディレクトリを意識してnpm installしないとデプロイできない事態になります・・・僕は最後のデプロイにモジュールの参照関係が原因でつまづき、けっこう長い時間ハマりました・・・
(firebase-debug.logをちゃんと見ずに対処していたので、3時間くらいかかりました・・・見ていないで同様に困っている方はちゃんと見ましょう。)
そのため、以下に行った作業を書いておきます。自分の備忘録でもあります。僕はMacで環境を作ったので、再整備の手順も記載しています。(コマンド実行してPermission Deniedだったら、sudo付けてもう一度。)
if you have installed tools to macos.
There is a reference site.
Uninstall Node.js with this command.
lsbom -f -l -s -pf /var/db/receipts/org.nodejs.pkg.bom \| while read i; do sudo rm /usr/local/${i}donesudo rm -rf /usr/local/lib/node \ /usr/local/lib/node_modules \ /var/db/receipts/org.nodejs.*Uninstall npm with this command.
sudo rm -rf ~/.npmExit and Quit Terminal.
Delete these following files in “/usr/local/bin” directory.
nodenpmnpxyarnyarnpkgInstall tools for develop functions.
Install Node.js Package here.
Open terminal.
mkdir cloudfunctionscd cloudfunctionsCheck firebase exists or not.
firebase --versionnpm install -g npm@8.4.0npm install -g firebase-toolsLogin Firebase account
firebase loginInitialize Firebase
Reference here …
firebase init- Functions: Configure a Cloud Functions directory and its files
- Use an existing project
- (project)
- Javascript or Typescript
- y
- Y
- Firebase initialization complete!
If you clone repository, you must fix following files.
- index.js
- .eslintrc.js
Setup modules for web-app.
sudo npm install -g yarnyarn -vcd functionsyarn add express request-promise-native corsnpm install requestExecute following command after you have edited code.
⚠️ Raise your project plan to “Blaze” before you deploy app.
cd ..firebase deployもしかしたら、Firebase権限で弾かれている可能性もあるため、その場合はこの記事をご参照ください。

おしまい
以上になります!
記事を共有
この記事が役に立ったなら、ぜひ他の人と共有してください!
音楽
再生中なし