


【GAS】Googleカレンダーに曜日を指定してスケジュールを登録するスプレッドシートの構築

はじまり


概要
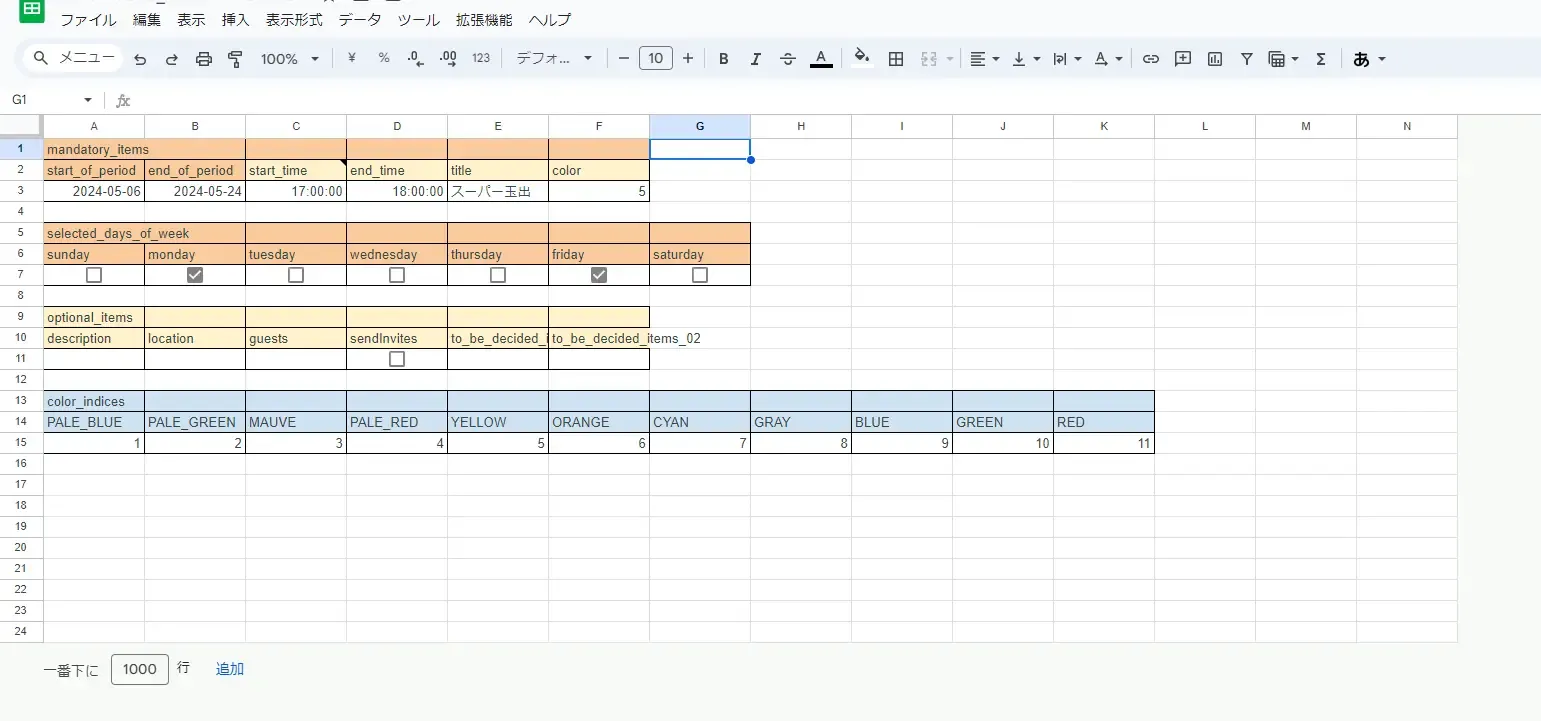
「Googleカレンダーに曜日を指定してスケジュールを登録するスプレッドシート」を作りました。 スプレッドシートの UI はこんなかんじになっていて、以下の 4 つの範囲に分かれています。
- 必須で入力する範囲
- 任意で入力する範囲
- 曜日を入力する範囲
- Google カレンダーのイベントの色のコード一覧(入力はしない。)
スクリプトが実行されるとこんな感じに Google カレンダーで入力されます。

カレンダーに入力する準備
それではまず、カレンダーに入力するための下準備に取り掛かります。
1. Google Cloudの Console での設定
必要ありません。
Google Cloud のコンソール上で「APIとサービス」で「Google Calendar API」というものが探せますが、この API は有効にする必要はありません。(ChatGPT-4 嘘付かないで!)
2. スクリプトの準備
以下の流れでスクリプトを作成します。
- Google スプレッドシートを開き、
ツール>Apps Scriptを選択してスクリプトエディタを開きます。 - スクリプトエディタで、
GoogleCalendarAppにアクセスし、イベントを操作する関数を記述します。
3. カレンダーへのアクセスとイベントの追加
以下は、特定の日付と時間にイベントを追加する基本的なスクリプトの例です。
この関数は、イベントのタイトル、開始時間、終了時間をパラメータとして受け取り、デフォルトの Google カレンダーに新しいイベントを追加します。 startTime と endTime は、JavaScript の Date オブジェクトに変換可能な形式である必要があります。
function addEventToCalendar(title, startTime, endTime) { var calendar = CalendarApp.getDefaultCalendar(); // デフォルトのカレンダーを取得 calendar.createEvent(title, new Date(startTime), new Date(endTime)); // イベントを作成}GoogleスプレッドシートのUI
カレンダーに入力する下地ができたので、次にスプシの UI を作ります。
作るエリアは、前述の通り、 4 種類になります。
- 必須で入力する範囲
- 任意で入力する範囲
- 曜日を入力する範囲
- Google カレンダーのイベントの色のコード一覧(入力はしない。)
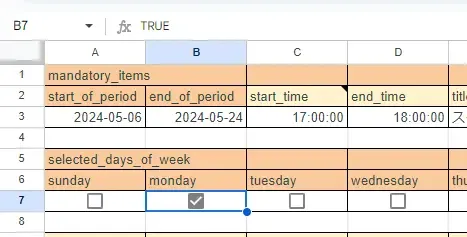
1. チェックボックスで曜日を指定できるようにする
Google スプシって、 Excel よりもUIが少ないのですが、チェックボックスなら搭載されています。
設定方法は、チェックボックスを使いたいセルを選択>「挿入」>「チェックボックス」をクリック の流れで行うことが出来ます。
チェックボックスは、trueとfalseの二値を持つことが出来ます。
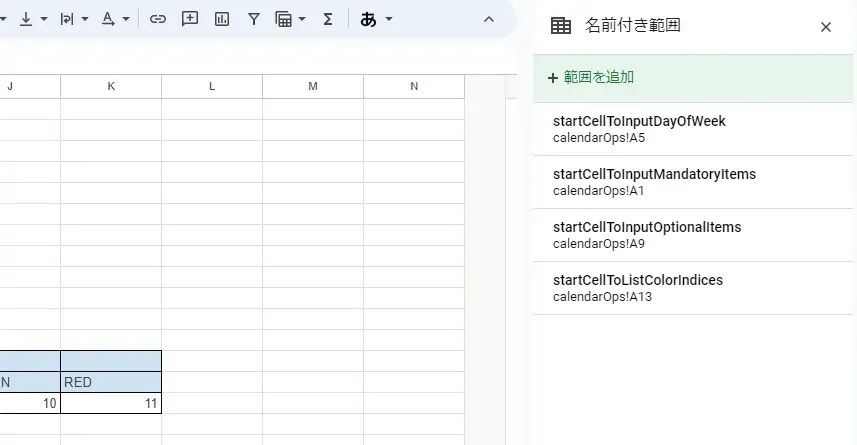
2. 名前付き範囲を設定する
そしたら次に、 Google スプレッドシート上に名前付き範囲を設定していきます。
これにより、スプシに入力された値をスクリプト上で取得しやすくします。(今回は、各範囲の左上のセルを名前付き範囲にします。)
設定方法は、名前付き範囲に指定したいセルを選択>「データ」>「名前付き範囲」をクリック の流れで行うことが出来ます。
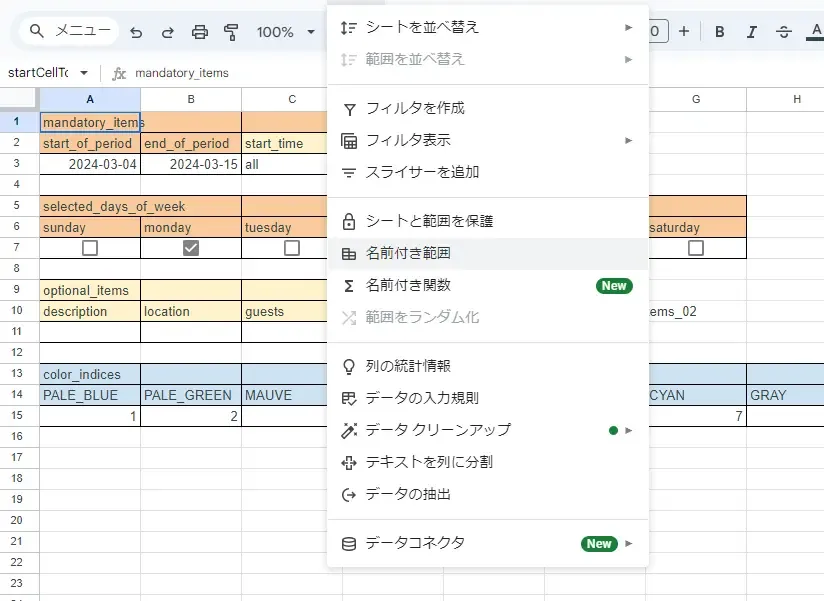
名前付き範囲はこんな感じで4つのエリアそれぞれに対して設定しました。
3. セルにメモを挿入する
そしたら、 1 箇所のセルにメモを付けます。こんな感じ。

このメモの内容は後々解説するとして・・・。
また、セルにメモを付けるのは、スクリプトで実行することも出来ます。ちなむと、名前付き範囲も設定できます。
function initializeSheet(sheetName=SHEET_NAME_12TH){ const rangeName01 = RANGE_NAME_IN_SHEET_12TH_TO_INPUT_MANDATORY_ITEMS; const rangeName02 = RANGE_NAME_IN_SHEET_12TH_TO_INPUT_DAY_OF_WEEK; const rangeName03 = RANGE_NAME_IN_SHEET_12TH_TO_INPUT_OPTIONAL_ITEMS; const rangeName04 = RANGE_NAME_IN_SHEET_12TH_TO_LIST_COLOR_INDICES; const ss = SpreadsheetApp.getActiveSpreadsheet(); const sheet = ss.getSheetByName(sheetName);
ss.setNamedRange(rangeName01, sheet.getRange("A1")); ss.setNamedRange(rangeName02, sheet.getRange("A5")); ss.setNamedRange(rangeName03, sheet.getRange("A9")); ss.setNamedRange(rangeName04, sheet.getRange("A13")); sheet.getRange(2, 3, 1, 1).setNote("「all」と入れると全日の予定になる");
console.log(`initializeSheet: 99999999999999999999999999999999999999999999999999999999999999999`); return true;}入力された値の整形
ここまでで、シートのUIは出来たので、次にそのシートで入力された値をカレンダーに入力するために整形していきます。
それではまず、ベースとなるスクリプトを書いていきます。
/** * @description Input calendar with sheet. * @param {string} sheetName * @param {boolean} isRecurring * @param {boolean} isRecording * @return {boolean}*/function inputCalendarWithSheet(sheetName=SHEET_NAME_12TH, isRecurring=false, isRecording=true){ const forms = RANGE_FORMS_IN_SHEET_12TH;
const sheet = SpreadsheetApp.getActiveSpreadsheet().getSheetByName(sheetName); const objNamedRange = getObjAboutCorrectnessOFNamedRanges(sheetName, forms); const isCorrect = objNamedRange["is_correct"]; if(!isCorrect){ console.log(`inputCalendarWithSheet wasn't executed.`); console.log(`inputCalendarWithSheet: 111111111111111111111111111111111111111111111111111111111111111`); return false; } console.log(isCorrect); console.log(objNamedRange); console.log(`inputCalendarWithSheet: 2222222222222222222222222222222222222222222222222222222222222222222`);
let itemsObj = getItemsFromNamedRangeInSheet(sheet, objNamedRange); console.log(itemsObj); console.log(`inputCalendarWithSheet: 333333333333333333333333333333333333333333333333333333333333333333`);
let statement = `<p>All mandatory items must be filled.</p>`; console.log(statement); if(!itemsObj["is_mandatory_filled"]){ displayHtml("index_html", "Calendar input failed.", statement) return false; } statement = `<p>Select a correct color index.</p>`; console.log(statement); if(!itemsObj["is_color_index_correct"]){ displayHtml("index_html", "Calendar input failed.", statement) return false; } statement = `<p>Guests must be specified with e-mail adress.</p>`; console.log(statement); if(!itemsObj["guests"] !== "" && !itemsObj["guests"].indexOf("@") === -1){ displayHtml("index_html", "Calendar input failed.", statement) return false; } console.log(`inputCalendarWithSheet: 444444444444444444444444444444444444444444444444444444444444444444`);
let isInput = inputCalendar(itemsObj, isRecurring, false); console.log(`inputCalendarWithSheet: 55555555555555555555555555555555555555555555555555555555555555555`);
console.log(`inputCalendarWithSheet: 99999999999999999999999999999999999999999999999999999999999999999`); return true;}1. 名前付き範囲が今のもので正しいかどうかを確認する
順序を追って行きましょう。
まず、getObjAboutCorrectnessOFNamedRanges()の関数で名前付き範囲が今のもので正しいかどうかを確認します。
/** * @description Crop multi images to output each image by values in the specified area to output message. * @param {string} sheetName * @param {string[]{}} formParams * @return {string{}} key: "data", "statement"and "is_correct".*/function getObjAboutCorrectnessOFNamedRanges(sheetName, forms){ const sheet = SpreadsheetApp.getActive().getSheetByName(sheetName); const namedRanges = sheet.getNamedRanges(); let objRequredNamedRanges = {}; let namedRange; let keyName = ""; let rangeNames = forms.map(form => { return form["name"]; }); console.log(rangeNames); console.log(`getObjAboutCorrectnessOFNamedRanges: 11111111111111111111111111111111111111111111111111111`); rangeNames.forEach(name => { objRequredNamedRanges[name] = {}; }); let formObj = {} forms.forEach(f => { formObj[f["name"]] = {"rows": f["rows"], "columns": f["columns"]}; }); Object.keys(namedRanges).forEach(key => { namedRange = namedRanges[key]; keyName = namedRange.getName(); if(!(rangeNames.includes(keyName))){ return; } objRequredNamedRanges[keyName]["row"] = namedRange.getRange().getRow(); objRequredNamedRanges[keyName]["column"] = namedRange.getRange().getColumn(); objRequredNamedRanges[keyName]["a1notation"] = namedRange.getRange().getA1Notation(); objRequredNamedRanges[keyName]["rows"] = formObj[keyName]["rows"]; objRequredNamedRanges[keyName]["columns"] = formObj[keyName]["columns"]; }); console.log(objRequredNamedRanges); console.log(`getObjAboutCorrectnessOFNamedRanges: 222222222222222222222222222222222222222222222222222222`);
let texts = []; for (const [key, value] of Object.entries(objRequredNamedRanges)){ texts.push(`'${key}': '${value["a1notation"]}'`); } console.log(texts); console.log(`getObjAboutCorrectnessOFNamedRanges: 333333333333333333333333333333333333333333333333333333`);
let statement = getStatementLineBrokenToDisplayArrays(texts, `'${sheetName}' sheet must have NamedRanges.\nNow, target names are declared on the following ranges...`, ":\n\n", "\n"); console.log(statement); console.log(`getObjAboutCorrectnessOFNamedRanges: 4444444444444444444444444444444444444444444444444444444`);
let returnObj = {}; returnObj["data"] = objRequredNamedRanges; returnObj["statement"] = statement;
let ui = SpreadsheetApp.getUi(); let reply = ui.alert(statement, ui.ButtonSet.YES_NO); if(reply === ui.Button.YES){ returnObj["is_correct"] = true; }else if(reply === ui.Button.NO){ console.log(`getObjAboutCorrectnessOFNamedRanges: 777777777777777777777777777777777777777777777777777777`); returnObj["is_correct"] = false; }else{ console.log(`The user clicked the close button in the dialog's title bar.`); console.log(`getObjAboutCorrectnessOFNamedRanges: 888888888888888888888888888888888888888888888888888888`); returnObj["is_correct"] = false; } return returnObj;}Google スプレッドシートでは、このような画面 UI が実装できるので、使っていきましょう。

2. getValues()をしてからオブジェクトとして取得する
それでは、名前付き範囲のチェックが終わったら、実際に入力値を整形していきます。
今回のスクリプトでは、SpreadsheetApp.spreadsheet.sheet.getValues()のメソッドを4回呼び出す形にしました。
1 回でもまあ出来ないことはないですし、そっちの方が挙動が速くなりそうですが、コードの見やすさを優先して4回の方にしました。
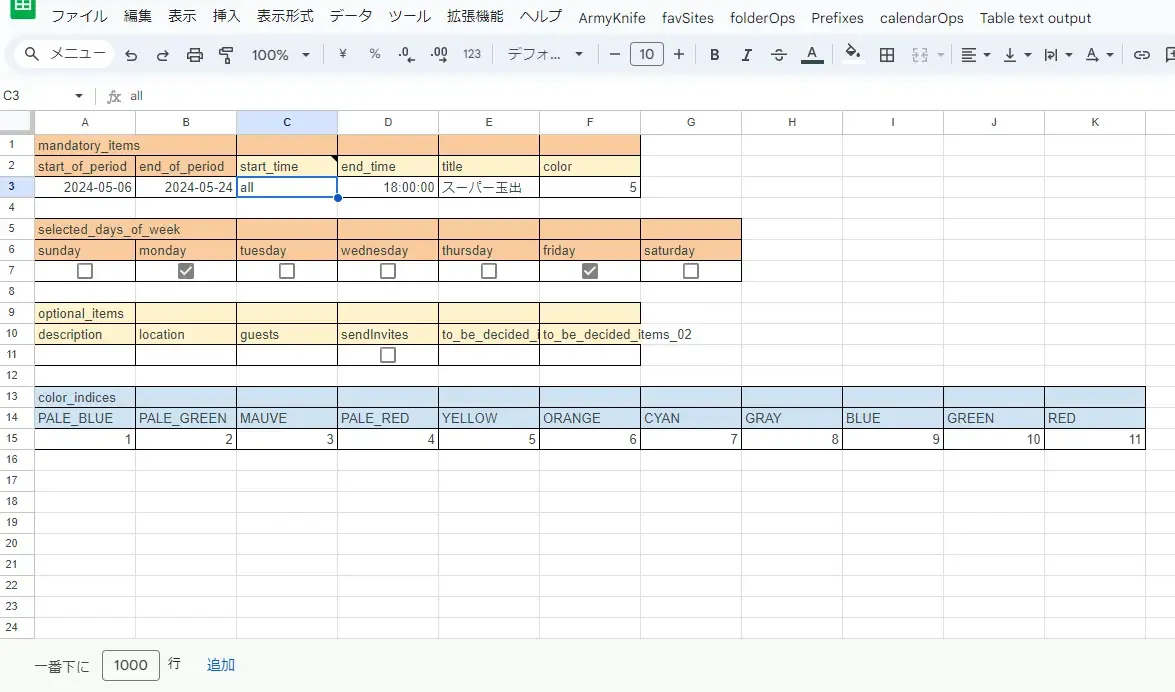
そして、取り出して 2 次元配列としてオブジェクトに割り当てた結果はコレです。
{ startCellToInputMandatoryItems: [ [ 'mandatory_items', '', '', '', '', '' ], [ 'start_of_period', 'end_of_period', 'start_time', 'end_time', 'title', 'color' ], [ '2024-05-06', '2024-05-24', '17:00:00', '18:00:00', 'スーパー玉出', 5 ] ], startCellToInputDayOfWeek: [ [ 'selected_days_of_week', '', '', '', '', '', '' ], [ 'sunday', 'monday', 'tuesday', 'wednesday', 'thursday', 'friday', 'saturday' ], [ false, true, false, false, false, true, false ] ], startCellToInputOptionalItems: [ [ 'optional_items', '', '', '', '', '' ], [ 'description', 'location', 'guests', 'sendInvites', 'to_be_decided_items_01', 'to_be_decided_items_02' ], [ '', '', '', false, '', '' ] ], startCellToListColorIndices: [ [ 'color_indices', '', '', '', '', '', '', '', '', '', '' ], [ 'PALE_BLUE', 'PALE_GREEN', 'MAUVE', 'PALE_RED', 'YELLOW', 'ORANGE', 'CYAN', 'GRAY', 'BLUE', 'GREEN', 'RED' ], [ 1, 2, 3, 4, 5, 6, 7, 8, 9, 10, 11 ] ] }そして、getItemsFromNamedRangeInSheet()のメソッドで色々コネコネして、各プロパティに対応させて入力値をオブジェクトに繁栄した結果がコレです。シート上の項目の名前をそのまま持ってきています。
{ is_mandatory_filled: true, is_color_index_correct: true, start_of_period: '2024-05-06', end_of_period: '2024-05-24', start_time: '17:00:00', end_time: '18:00:00', title: 'スーパー玉出', color: 5, selected_days_of_week: [ false, true, false, false, false, true, false ], description: '', location: '', guests: '', sendInvites: false, to_be_decided_items_01: '', to_be_decided_items_02: '' }特に、selected_days_of_weekのプロパティですが、これはシート上でチェックボックスで選択された曜日を格納した値になっています。
カレンダーに曜日指定で入力する
それでは、この整形したオブジェクトを引き下げて、カレンダーへのスケジュールを入力していきたいと思います。
1. カレンダー入力前のチェック
と、その前に必要項目がちゃんと入力されているかどうかなどをチェックします。
チェックに引っかかったらCalendar input failed.をシート上のHTMLで表示してカレンダー入力処理は行いません。
let statement = `<p>All mandatory items must be filled.</p>`; console.log(statement); if(!itemsObj["is_mandatory_filled"]){ displayHtml("index_html", "Calendar input failed.", statement) return false; } statement = `<p>Select a correct color index.</p>`; console.log(statement); if(!itemsObj["is_color_index_correct"]){ displayHtml("index_html", "Calendar input failed.", statement) return false; } statement = `<p>Guests must be specified with e-mail adress.</p>`; console.log(statement); if(!itemsObj["guests"] !== "" && !itemsObj["guests"].indexOf("@") === -1){ displayHtml("index_html", "Calendar input failed.", statement) return false; } console.log(`inputCalendarWithSheet: 444444444444444444444444444444444444444444444444444444444444444444`);2. カレンダー入力処理の全体
それでは、やっとカレンダー入力処理に着手します。
inputCalendar()メソッドで行っていきます。
/** * @description Input calendar. * @param {any{}} itemsObj * @param {boolean} isRecurring * @param {boolean} isRecording * @return {boolean}*/function inputCalendar(itemsObj, isRecurring=false, isRecording=true){ const calendar = CalendarApp.getDefaultCalendar(); const weekdaysOnGoogleCalendar = [ CalendarApp.Weekday.SUNDAY , CalendarApp.Weekday.MONDAY , CalendarApp.Weekday.TUESDAY , CalendarApp.Weekday.WEDNESDAY , CalendarApp.Weekday.THURSDAY , CalendarApp.Weekday.FRIDAY , CalendarApp.Weekday.SATURDAY ];
const valueReferingToAllDayAtCellOfStartOfPeriod = "all"; const timeDiffGMT9 = 14; const timezoneStr = ""; // const timezoneStr = "+09:00";
let inputingWeekdays = () => { let wds = []; for(let i = 0; i < weekdaysOnGoogleCalendar.length; i++){ itemsObj["selected_days_of_week"][i] ? wds.push(weekdaysOnGoogleCalendar[i]) : doNothing(); } return wds; }; console.log(inputingWeekdays()); console.log(`inputCalendar: 111111111111111111111111111111111111111111111111111111111111111`);
let title = itemsObj["title"]; let recurrence; if(isRecurring){ recurrence = CalendarApp.newRecurrence().addWeeklyRule() .onlyOnWeekdays(inputingWeekdays()) .until(new Date(`${itemsObj["end_of_period"]}T23:59:59${timezoneStr}`)); } let options = {}; ["description", "location", "guests", "sendInvites"].forEach(option => { itemsObj[option] !== "" ? options[option] = itemsObj[option] : doNothing(); }) console.log(options); console.log(`inputCalendar: 2222222222222222222222222222222222222222222222222222222222222222222`);
let eventSeries; let startTime, endTime; if(itemsObj["start_time"] === valueReferingToAllDayAtCellOfStartOfPeriod){ startTime = new Date(`${itemsObj["start_of_period"]}T00:00:00${timezoneStr}`); if(isRecurring){ if(Object.keys(options).length === 0){ eventSeries = calendar.createAllDayEventSeries(title, startTime, recurrence); }else{ eventSeries = calendar.createAllDayEventSeries(title, startTime, recurrence, options); } }else{ endTime = new Date(`${itemsObj["end_of_period"]}T00:00:00${timezoneStr}`); let inputtingTimestampsFromStart = getInputtingTimestamps(itemsObj["selected_days_of_week"], startTime, endTime); if(Object.keys(options).length === 0){ inputtingTimestampsFromStart.forEach(ts => { let inputDate = new Date(); inputDate.setTime(ts); console.log(inputDate); console.log(`inputCalendar: ~~~~~~~~~~~~~~~~~~~~~~~~~~~~~~~~~~~~~~~~~~~~~~~~~~~~~~~~~~~~`); eventSeries = calendar.createAllDayEvent(title, inputDate); eventSeries.setColor(itemsObj["color"]); }) }else{ inputtingTimestampsFromStart.forEach(ts => { let inputDate = new Date(); inputDate.setTime(ts); console.log(inputDate); console.log(`inputCalendar: {{{{{{{{{{{{{{{{{{{{{{{{{{{{{{{}}}}}}}}}}}}}}}}}}}}}}}}}}}}}}}`); eventSeries = calendar.createAllDayEvent(title, inputDate, options); eventSeries.setColor(itemsObj["color"]); }) } } console.log(`inputCalendar: 4444444444444444444444444444444444444444444444444444444444444444444`);
}else{ startTime = new Date(`${itemsObj["start_of_period"]}T${itemsObj["start_time"]}`); let tempTimestamp = startTime.getTime() - timeDiffGMT9 * 60 * 60 * 1000; startTime.setTime(tempTimestamp); endTime = new Date(`${itemsObj["start_of_period"]}T${itemsObj["end_time"]}`); tempTimestamp = endTime.getTime() - timeDiffGMT9 * 60 * 60 * 1000; endTime.setTime(tempTimestamp); console.log(startTime); console.log(endTime); console.log(`inputCalendar: 55555555555555555555555555555555555555555555555555555555555555555555`);
let endTime02 = new Date(`${itemsObj["end_of_period"]}T00:00:00${timezoneStr}`); if(isRecurring){ if(Object.keys(options).length === 0){ eventSeries = calendar.createEventSeries(title, startTime, endTime, recurrence); }else{ eventSeries = calendar.createEventSeries(title, startTime, endTime, recurrence, options); } console.log(`inputCalendar: 6666666666666666666666666666666666666666666666666666666666666666666`); }else{ let inputtingTimestampsFromStart01 = getInputtingTimestamps(itemsObj["selected_days_of_week"], startTime, endTime02, itemsObj["start_time"]); let inputtingTimestampsFromStart02 = getInputtingTimestamps(itemsObj["selected_days_of_week"], startTime, endTime02, itemsObj["end_time"]); if(Object.keys(options).length === 0){ for(let i = 0; i < inputtingTimestampsFromStart01.length; i++){ let inputDate01 = new Date(); inputDate01.setTime(inputtingTimestampsFromStart01[i] - timeDiffGMT9 * 60 * 60 * 1000); let inputDate02 = new Date(); inputDate02.setTime(inputtingTimestampsFromStart02[i] - timeDiffGMT9 * 60 * 60 * 1000); console.log(inputDate01); console.log(inputDate02); console.log(`inputCalendar: ^^^^^^^^^^^^^^^^^^^^^^^^^^^^^^^^^^^^^^^^^^^^^^^^^^^^^^^^^^^^^^^`); eventSeries = calendar.createEvent(title, inputDate01, inputDate02); eventSeries.setColor(itemsObj["color"]); } }else{ for(let i = 0; i < inputtingTimestampsFromStart01.length; i++){ let inputDate01 = new Date(); inputDate01.setTime(inputtingTimestampsFromStart01[i] - timeDiffGMT9 * 60 * 60 * 1000); let inputDate02 = new Date(); inputDate02.setTime(inputtingTimestampsFromStart02[i] - timeDiffGMT9 * 60 * 60 * 1000); console.log(inputDate01); console.log(inputDate02); console.log(`inputCalendar: >>>>>>>>>>>>>>>>>>>>>>>>>>>>>>>>>>>>>>>>>>>>>>>>>>>>>>>>>>>>>>>`); eventSeries = calendar.createEvent(title, inputDate01, inputDate02, options); eventSeries.setColor(itemsObj["color"]); } } } } eventSeries.setColor(itemsObj["color"]); console.log(options); console.log(`inputCalendar: 777777777777777777777777777777777777777777777777777777777777777777`);
console.log(`inputCalendar: 8888888888888888888888888888888888888888888888888888888888888888`);
console.log(`inputCalendar: 99999999999999999999999999999999999999999999999999999999999999999`);}とても長いですが・・・、今回の入力処理は、以下の 3 種類の条件分岐を設けることで 8 通りに変化します。
- 全日のスケジュールかどうか。
- 繰り返し入力かどうか。
- 任意の(オプション)項目が入力されているかどうか
それでは、各条件の詳細に移りましょう。
3. カレンダー入力処理の分岐(全日のスケジュールかどうか)
1 つ目の条件分岐ですが、これは前述した、「3. セルにメモを挿入する」の部分で少し触れた、「allと入れると全日の予定になる」になるという機能です。
Google カレンダーでは、時間が指定されたイベントと、時間が指定されていない(全日)イベントの2種類を入力することが出来ます。
そして、このシートでは、"start_time"にallが入力されると全日の予定になります。該当する処理のコードブロックはこの部分です。
if(itemsObj["start_time"] === valueReferingToAllDayAtCellOfStartOfPeriod){ startTime = new Date(`${itemsObj["start_of_period"]}T00:00:00${timezoneStr}`); if(isRecurring){ if(Object.keys(options).length === 0){ eventSeries = calendar.createAllDayEventSeries(title, startTime, recurrence); }else{ eventSeries = calendar.createAllDayEventSeries(title, startTime, recurrence, options); } }else{ endTime = new Date(`${itemsObj["end_of_period"]}T00:00:00${timezoneStr}`); let inputtingTimestampsFromStart = getInputtingTimestamps(itemsObj["selected_days_of_week"], startTime, endTime); if(Object.keys(options).length === 0){ inputtingTimestampsFromStart.forEach(ts => { let inputDate = new Date(); inputDate.setTime(ts); console.log(inputDate); console.log(`inputCalendar: ~~~~~~~~~~~~~~~~~~~~~~~~~~~~~~~~~~~~~~~~~~~~~~~~~~~~~~~~~~~~`); eventSeries = calendar.createAllDayEvent(title, inputDate); eventSeries.setColor(itemsObj["color"]); }) }else{ inputtingTimestampsFromStart.forEach(ts => { let inputDate = new Date(); inputDate.setTime(ts); console.log(inputDate); console.log(`inputCalendar: {{{{{{{{{{{{{{{{{{{{{{{{{{{{{{{}}}}}}}}}}}}}}}}}}}}}}}}}}}}}}}`); eventSeries = calendar.createAllDayEvent(title, inputDate, options); eventSeries.setColor(itemsObj["color"]); }) } } console.log(`inputCalendar: 4444444444444444444444444444444444444444444444444444444444444444444`);
}else{これからのこの章の解説は、このコードブロックをベースに解説していきます。
4. カレンダー入力処理の分岐(繰り返し入力かどうか)
次に、「繰り返し入力かどうか」の分岐についてです。
繰り返し入力にすると、 Google カレンダー上でまとまったイベントとして処理できます。
例えば、このように入力して繰り返し入力で Google カレンダーにインプットすると・・・
Google カレンダー上で、イベントの束を一気に処理できるようになります。
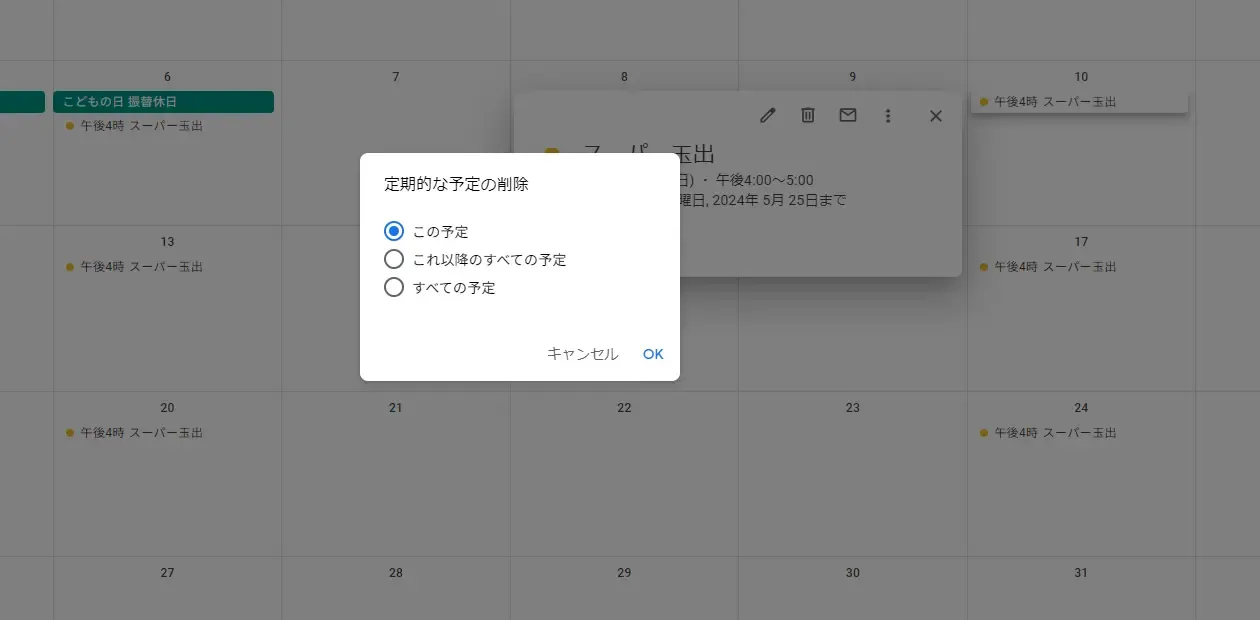
しかし、場合によっては、この「定期的な予定の削除」ダイアログが表示されるのが鬱陶しいこともあるかもしれません。 なので、繰り返し入力かどうかを分岐できるように今回のツールでは実装しています。
そこで、繰り返し入力「ではない」バージョンの処理がこちら。
let inputtingTimestampsFromStart01 = getInputtingTimestamps(itemsObj["selected_days_of_week"], startTime, endTime02, itemsObj["start_time"]); let inputtingTimestampsFromStart02 = getInputtingTimestamps(itemsObj["selected_days_of_week"], startTime, endTime02, itemsObj["end_time"]); if(Object.keys(options).length === 0){ for(let i = 0; i < inputtingTimestampsFromStart01.length; i++){ let inputDate01 = new Date(); inputDate01.setTime(inputtingTimestampsFromStart01[i] - timeDiffGMT9 * 60 * 60 * 1000); let inputDate02 = new Date(); inputDate02.setTime(inputtingTimestampsFromStart02[i] - timeDiffGMT9 * 60 * 60 * 1000); console.log(inputDate01); console.log(inputDate02); console.log(`inputCalendar: ^^^^^^^^^^^^^^^^^^^^^^^^^^^^^^^^^^^^^^^^^^^^^^^^^^^^^^^^^^^^^^^`); eventSeries = calendar.createEvent(title, inputDate01, inputDate02); eventSeries.setColor(itemsObj["color"]); } }else{ for(let i = 0; i < inputtingTimestampsFromStart01.length; i++){ let inputDate01 = new Date(); inputDate01.setTime(inputtingTimestampsFromStart01[i] - timeDiffGMT9 * 60 * 60 * 1000); let inputDate02 = new Date(); inputDate02.setTime(inputtingTimestampsFromStart02[i] - timeDiffGMT9 * 60 * 60 * 1000); console.log(inputDate01); console.log(inputDate02); console.log(`inputCalendar: >>>>>>>>>>>>>>>>>>>>>>>>>>>>>>>>>>>>>>>>>>>>>>>>>>>>>>>>>>>>>>>`); eventSeries = calendar.createEvent(title, inputDate01, inputDate02, options); eventSeries.setColor(itemsObj["color"]); } }5. 繰り返し入力をしないバージョンの処理
繰り返し入力しない、かつ曜日を指定して入力する。
この 2 つの要件で行う処理が今回、最も面倒くさかった部分です。(一応動くことには動きますが、少し至っていない部分もあります。)
まず、メソッドでタイムスタンプの配列を取得します。
/** * @description Get timestamps to input event to calendar. * @param {boolean[]} selectedDaysOfWeek: length must be 7. * @param {Date()} startDate * @param {Date()} endDate * @param {string} addingTime * @return {number[]}*/function getInputtingTimestamps(selectedDaysOfWeek, startDate, endDate, addingTime="00:00:00"){ const weekdaysOnPrimitiveJsString = [ "Sun", "Mon", "Tue", "Wed", "Thu", "Fri", "Sat" ]; const timezoneStr = ""; // const timezoneStr = "+09:00"; let dow = startDate[Symbol.toPrimitive]("string").substring(0, 3); // get day of week let dowIndex = weekdaysOnPrimitiveJsString.indexOf(dow); let tempTimestamp01 = startDate.getTime(); let tempTimestamp02 = endDate.getTime(); let oneDayInTimestamp = 24 * 60 * 60 * 1000; let periodDays = Math.floor((tempTimestamp02 - tempTimestamp01) / oneDayInTimestamp) + 2; // なぜかタイムゾーンがズレるので仕方なく+2してる。本来は+1の筈。 let inputtingTimestampsFromStart = []; // let s; console.log(startDate); console.log(endDate); console.log(dow); console.log(dowIndex); console.log(`getInputtingTimestamps: 3333333333333333333333333333333333333333333333333333333333333333333`); console.log(tempTimestamp01); console.log(tempTimestamp02); console.log(periodDays); console.log(`getInputtingTimestamps: 4444444444444444444444444444444444444444444444444444444444444444444`); console.log(tempTimestamp01); console.log(oneDayInTimestamp); console.log(`getInputtingTimestamps: 5555555555555555555555555555555555555555555555555555555555555555555`); for(let i = 0; i < periodDays; i++){ s = (dowIndex + i) % (weekdaysOnPrimitiveJsString.length); console.log(s); console.log(selectedDaysOfWeek[s]); let at = new Date(`2001-04-01T${addingTime}${timezoneStr}`); let atTimestamp = (at.getHours() * 60 + at.getMinutes()) * 60 * 1000; console.log(addingTime); console.log(atTimestamp); console.log(`getInputtingTimestamps: 66666666666666666666666666666666666666666666666666666666666666666666`); selectedDaysOfWeek[s] ? inputtingTimestampsFromStart.push(tempTimestamp01 + i * oneDayInTimestamp + atTimestamp) : doNothing(); // selectedDaysOfWeek[s] ? inputtingTimestampsFromStart.push(tempTimestamp01 + i * oneDayInTimestamp) : doNothing(); } console.log(inputtingTimestampsFromStart); console.log(`getInputtingTimestamps: &&&&&&&&&&&&&&&&&&&&&&&&&&&&&&&&&&&&&&&&&&&&&&&&&&&&&&&&&&&&&&&&`);
return inputtingTimestampsFromStart;}どういうタイムスタンプを取得するのかと言うと、 Google カレンダーに入力する日時のタイムスタンプになります。
どうやって、取得しているかと言うと・・・
- まず、
"start_date"プロパティで指定されている日付を使います。 - この日付が何曜日なのかを取得します。方法は、
startDate[Symbol.toPrimitive]("string").substring(0, 3)というメソッドで「Sun」やら「Fri」やらの曜日を表す文字列を取得します。 - そして、本メソッドの冒頭で、
weekdaysOnPrimitiveJsStringを宣言しています。この配列(本節では今後①と呼びます。)のインデックスは、以下の配列と対応しています。- シートで入力した曜日を持っている、
selected_days_of_weekのプロパティ内の配列。(本節では今後②と呼びます。) inputCalendarメソッド内weekdaysOnGoogleCalendarの配列。(本節では今後③と呼びます。)
- シートで入力した曜日を持っている、
for(let i = 0; i < periodDays; i++){の行から入力する日時を取得する処理です。- ①とイテレーションする変数
sを使ってインデックスを取得して、そのインデックスを②に紐づけてtrueかfalseを取得します。trueだったら、その時のタイムスタンプをカレンダー入力用の配列に格納する。
これで、カレンダーを入力する配列は出来ました。
しかしながら、ちなみに、new Date()するときにタイムゾーンがズレる問題というものがあり、これが原因でこの行だけ少し不服な処理になってしまっています。(一応動きますけど・・・)
+2 することで、 1 日余分に入力してしまう可能性が生まれています。まあ、多くイベントを作ってしまったら、余分な所は手で削除することにします。
let periodDays = Math.floor((tempTimestamp02 - tempTimestamp01) / oneDayInTimestamp) + 2; // なぜかタイムゾーンがズレるので仕方なく+2してる。本来は+1の筈。その、「タイムゾーンがズレる問題」がこんな感じ。結局原因が分からなかった・・・。
発生する時としない時があって、事象の再現方法も分からない・・・。
inputCalendar: 2222222222222222222222222222222222222222222222222222222222222222222Mon May 06 2024 03:00:00 GMT-0400 (Eastern Daylight Time)Mon May 06 2024 04:00:00 GMT-0500 (Western Digital Time)inputCalendar: 555555555555555555555555555555555555555555555555555555555555555555556. カレンダーへイベントを入力する
とまあ、そんなこともありましたが、一応入力する準備は出来ました。
カレンダーにイベント、スケジュールを入力していきます。繰り返さないで入力する場合はこんな感じです。inputDateは、タイムスタンプではなくDateオブジェクトです。
// 全日イベントを繰り返さないで入力eventSeries = calendar.createAllDayEvent(title, inputDate);
// 時間を指定したイベントを繰り返さないで入力eventSeries = calendar.createEvent(title, inputDate);7. カレンダー入力処理の分岐(任意の(オプション)項目が入力されているかどうか)
そして、ここらでオプションの有無を確認します。スプレッドシートの任意項目を入力している場合、optionsを渡して Google カレンダーにイベントを入力していきます。
optionsをnullにして渡す事も考えましたが、GASのリファレンスでは、optionsを渡す場合と渡さない場合でメソッドの項目が棲み分けられていたので、念のため処理を分岐させています。
// 全日イベントの入力if(Object.keys(options).length === 0){ eventSeries = calendar.createAllDayEventSeries(title, startTime, recurrence);}else{ eventSeries = calendar.createAllDayEventSeries(title, startTime, recurrence, options);}
// 時間を指定したイベントの入力if(Object.keys(options).length === 0){ eventSeries = calendar.createEventSeries(title, startTime, endTime, recurrence);}else{ eventSeries = calendar.createEventSeries(title, startTime, endTime, recurrence, options);}console.log(`inputCalendar: 6666666666666666666666666666666666666666666666666666666666666666666`);8. . 繰り返し入力をするバージョンの処理
前節でチラッとメソッドを出しましたが、createEventSeries()で、時間を指定したイベントの入力を繰り返し入力として行います。createAllDayEventSeries()も全日イベントになるだけで同様に繰り返し入力をするメソッドになっています。
スクリプトを書く上では、繰り返し入力の方が書きやすいですね。
let eventSeries; let startTime, endTime; if(itemsObj["start_time"] === valueReferingToAllDayAtCellOfStartOfPeriod){ startTime = new Date(`${itemsObj["start_of_period"]}T00:00:00${timezoneStr}`); if(isRecurring){ // 繰り返す if(Object.keys(options).length === 0){ eventSeries = calendar.createAllDayEventSeries(title, startTime, recurrence); }else{ eventSeries = calendar.createAllDayEventSeries(title, startTime, recurrence, options); } }else{ // 繰り返さない endTime = new Date(`${itemsObj["end_of_period"]}T00:00:00${timezoneStr}`); let inputtingTimestampsFromStart = getInputtingTimestamps(itemsObj["selected_days_of_week"], startTime, endTime); if(Object.keys(options).length === 0){ inputtingTimestampsFromStart.forEach(ts => { let inputDate = new Date(); inputDate.setTime(ts); console.log(inputDate); console.log(`inputCalendar: ~~~~~~~~~~~~~~~~~~~~~~~~~~~~~~~~~~~~~~~~~~~~~~~~~~~~~~~~~~~~`); eventSeries = calendar.createAllDayEvent(title, inputDate); eventSeries.setColor(itemsObj["color"]); }) }else{ inputtingTimestampsFromStart.forEach(ts => { let inputDate = new Date(); inputDate.setTime(ts); console.log(inputDate); console.log(`inputCalendar: {{{{{{{{{{{{{{{{{{{{{{{{{{{{{{{}}}}}}}}}}}}}}}}}}}}}}}}}}}}}}}`); eventSeries = calendar.createAllDayEvent(title, inputDate, options); eventSeries.setColor(itemsObj["color"]); }) } } console.log(`inputCalendar: 4444444444444444444444444444444444444444444444444444444444444444444`);
}else{9. 全日イベントで繰り返さない入力をしてみる
そしたら、実際に入力してみましょう。
start_timeにallを入力してスクリプトを実行します。
ちなみに、 Google スプレッドシートではメニューの UI にボタンを追加することが出来ます。「google スプレッドシート onOpen メニュー」でググったら出てくると思います!
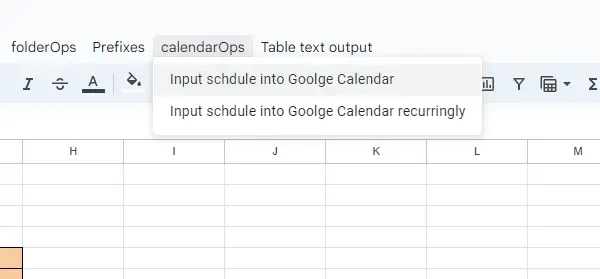
そして、 Google カレンダーで確認します。 入力されています。
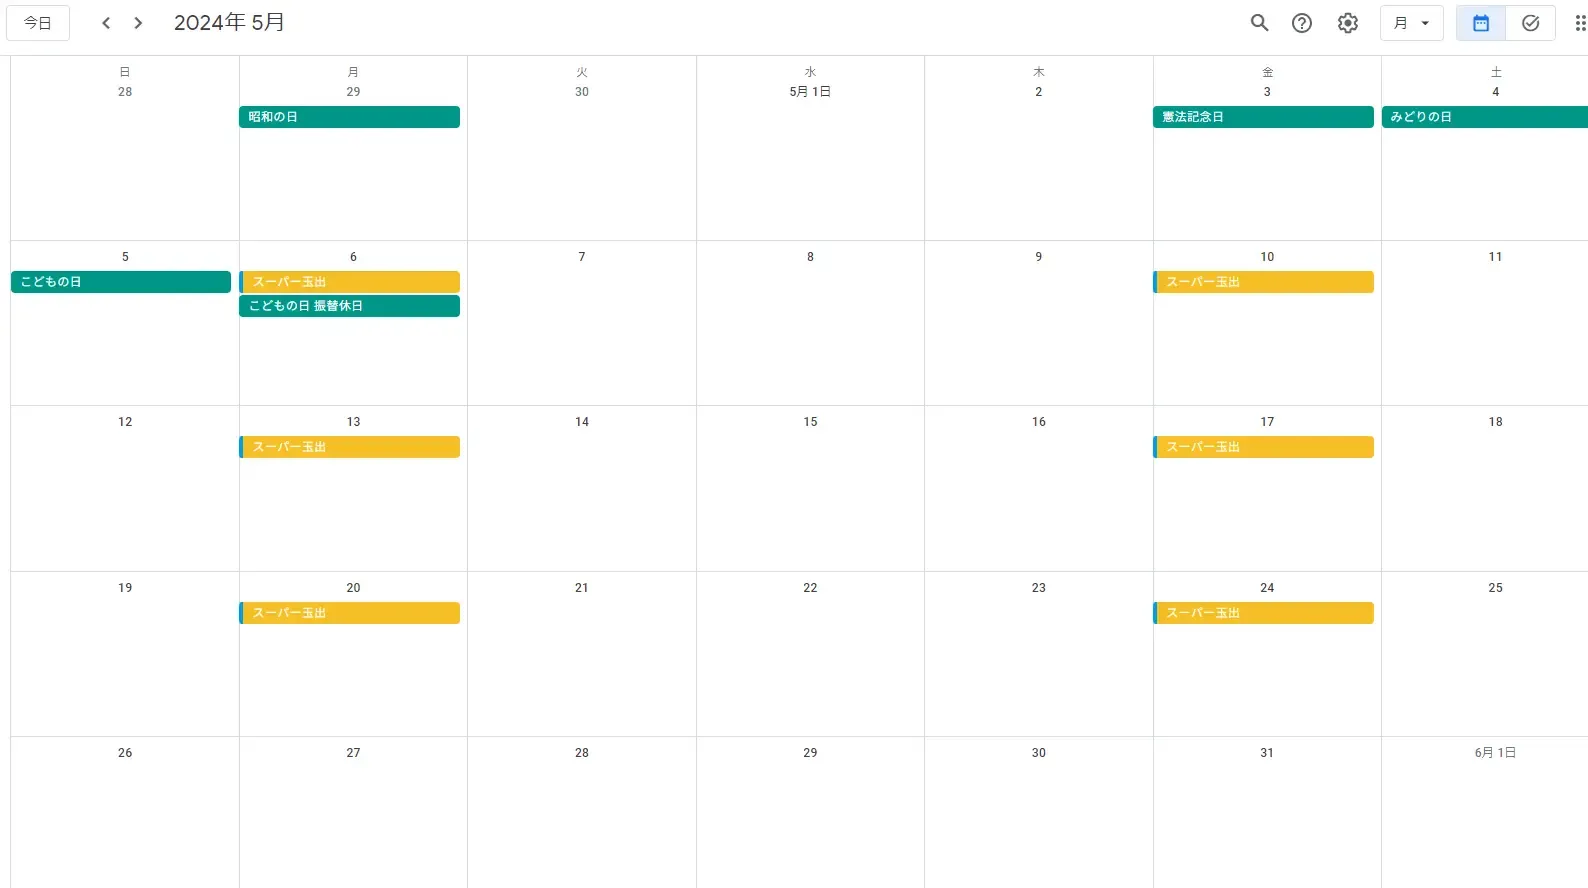
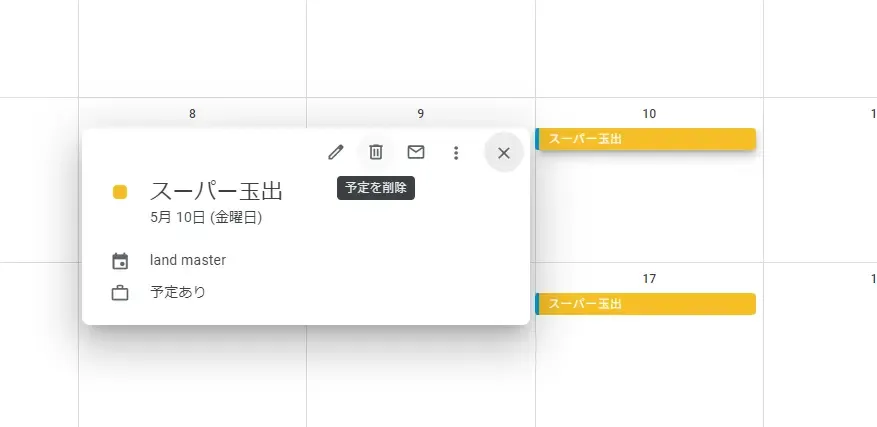
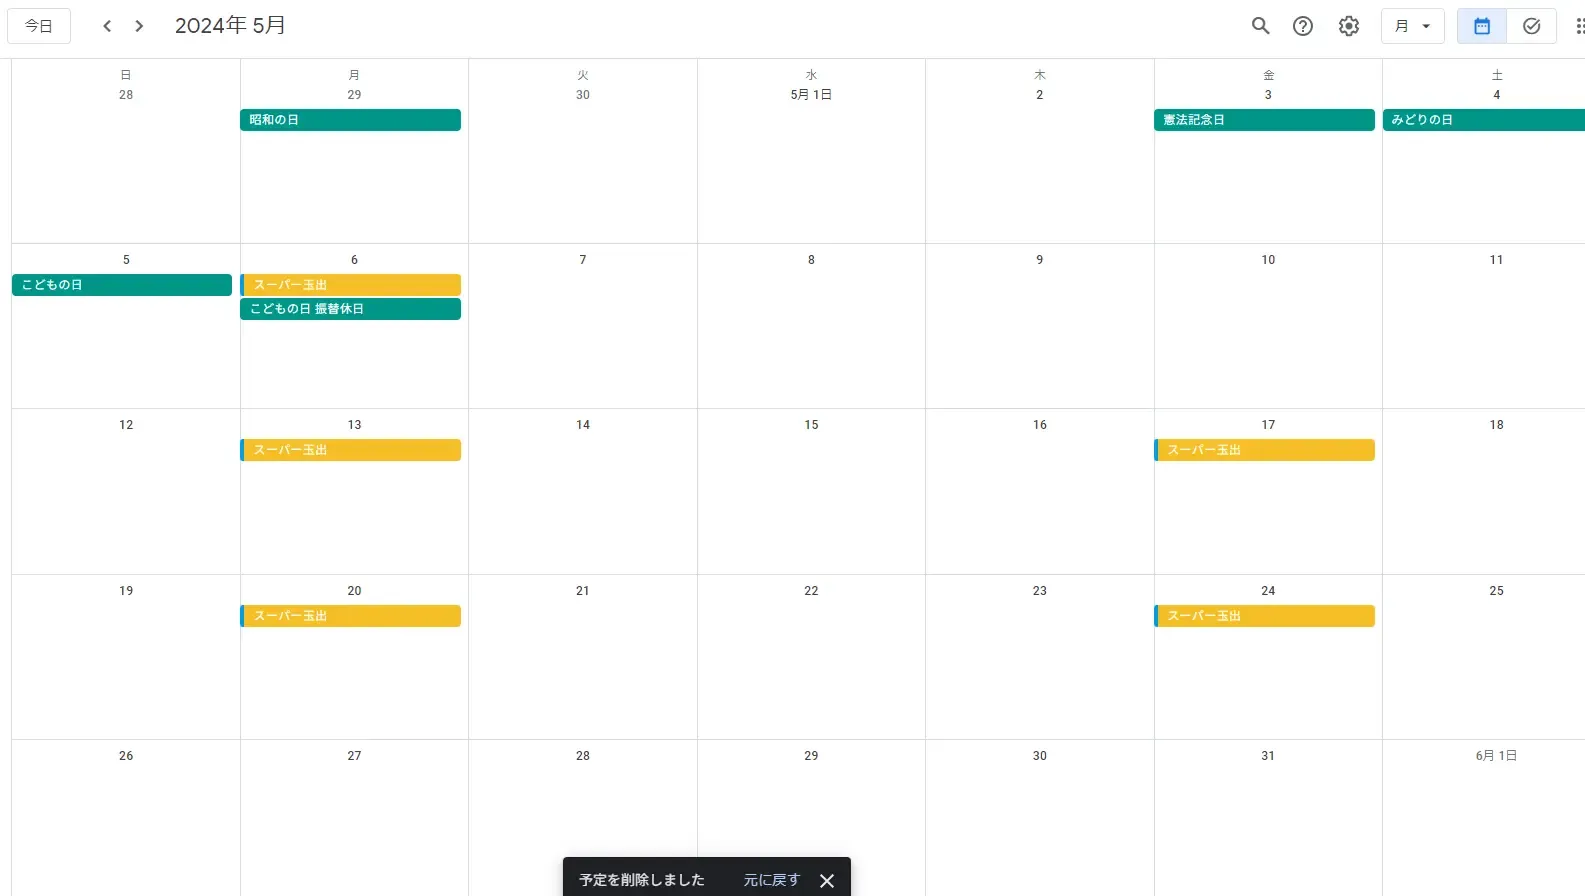
繰り返し入力にしていなければ、削除ボタンをクリックすればすぐ消えてくれます。
まとめ
GAS と Google スプレッドシートを利用して、曜日を指定して Google カレンダーにスケジュールを効率的に追加する方法でした。
以下の流れで行ったので、ご参考下さい。
- スクリプトの準備
- カレンダーへのイベントの追加の導入
- Google スプレッドシートの UI の設計
- 入力値の書式設定
- 指定された曜日に基づいたカレンダーへのスケジュールの入力
おしまい
以上になります!
記事を共有
この記事が役に立ったなら、ぜひ他の人と共有してください!
音楽
再生中なし